Quinoa pizza snack bites

https://www.diabetescarecommunity.ca/diet-and-fitness-articles/recipes/quinoa-pizza-snack-bites/

I call these a snack, but a handful of these, a great salad and eggs, would make for a delicious light dinner - a perfect meal! Kids and adults love these. They are perfect in the lunchbox, warm or room temp! You can make these in fun shapes such as heart shaped muffin cups or a regular 24 mini-cup muffin tin.

INGREDIENTS DIRECTIONS
  1. Preheat oven to 350°F.
  2. Grease a 24-cup mini muffin tin with non-stick spray.
  3. Mix the cooled quinoa with all the other ingredients EXCEPT the pizza sauce.
  4. Fill each cup to the top with the mixture, press down to compact a little and then fill up some more.
  5. Bake for 20 minutes or until golden brown.
  6. Let cool for 10 minutes before removing them from the muffin tin.
  7. I like to “reheat” them in an oven set to broil with the rack in the top position. I place each mini muffin on a tin foil lined cookie sheet and sprinkle them with a little extra shredded cheese, and then broil until the cheese is melted and bubbling.
  8. Serve with warm pizza sauce in a separate bowl.
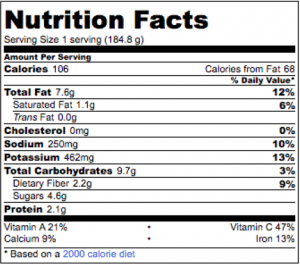
*To cook quinoa: Rinse quinoa in a strainer, put into a small sauce pan with 1½ cups water, and bring to a boil. Reduce the heat and simmer covered for 15 minutes, fluff with a fork and let cool with lid off. Serves 12 (2 snack bites each), about 62g. NOTE: Nutritional content below is based on using sundried tomatoes.

Whole grain fruit and nut granola

https://www.diabetescarecommunity.ca/diet-and-fitness-articles/recipes/whole-grain-fruit-and-nut-granola/

This granola is a lower-in-fat, lower-in-sugar version of the stuff we all love to eat. The mix of spelt, barley and oats gives it a great nutty flavor and texture, high in fibre and ranks low on the glycemic index making it a great grain choice! Many of these ingredients can be found in a specialty health food store or in the organic section of your local grocery store. Bob’s Red Mill brand packages rolled oats, spelt, barley and kamut.

DIRECTIONS
  1. Preheat oven to 325°F, line cookie sheet with foil.
  2. In a large bowl, toss together all the grains and nuts and seeds; sprinkle with cinnamon and salt. In a small bowl or measuring cup, mix together the oil, juice, and syrup. Pour over grain/seed/nut mixture, and mix well.
  3. Spread mixture on tin foil covered cookie sheet. Place in centre of oven. Cook for 10 minutes, remove from oven. Toss mixture around on the cookie sheet and place back in the oven, and cook for another 10 minutes. Remove, add coconut, toss, and put back in the oven. Cook for another 10 minutes. The mixture should be golden brown and crunchy. It will crisp more once it cools. Remove from oven.
  4. Add dried fruit, mix and cool. Store in air tight container in a cool dry place for a few months.
INGREDIENTS Grains & Nut Mixture- should be roughly 2 cups grain and nuts/1 cup flavours/liquid/dried fruit - this is my preferred version - it is simply a guide for improvising! Optional ingredients - up to 2 tbsp of - ground flax seed, hemp seed, poppy seed, sesame seed, wheat germ. Flavours/Liquids/DriedFruit Optional Ingredients- 50g dark chocolate, chopped in small pieces Makes about 4 cups. Serving size: about 1/3 cup (40g)
Nutritional information is based on recipe without optional ingredients.

Greek style chicken kebabs

https://www.diabetescarecommunity.ca/diet-and-fitness-articles/recipes/greek-style-chicken-kebabs/

This is a sure thing family favourite. You can grill the chicken on skewers or simply as boneless chicken thighs or breasts. You can double or triple the recipe easily and even freeze the chicken in the marinade and you have a ‘ready-to-go’ meal on hand.

INGREDIENTS DIRECTIONS
  1. Combine the ingredients (first 8 ingredients) for the chicken marinade in a medium sized bowl and add chicken. Let marinate for several hours or overnight.
  2. When ready to grill the chicken, heat grill to high. Put 4-5 chicken pieces on each skewer with 2 pieces of red onion in between each piece of chicken.
  3. Grill the chicken on medium/high.Turn after 4-5 minutes or when the chicken releases easily from the grill and golden grill marks have formed. Grill on 3-4 sides (10-15 minutes total cooking time).
  4. Serve hot or room temperature.
Serves 8 4oz, 122.6g portions (I like to remove the chicken from the skewers before serving). Please Note: The salt and the oil quantity may appear high, however, this is a marinade; when you go to grill the chicken, most of the marinade is left behind and discarded.

Mediterranean sea bass with sun dried tomato coulis

https://www.diabetescarecommunity.ca/diet-and-fitness-articles/recipes/mediterranean-sea-bass-with-sun-dried-tomato-coulis/

The addition of a small amount of fennel in the marinade adds a fabulous crunch to the end product.  Using a high quality balsamic adds so much depth in flavor.

INGREDIENTS
  • 2lb Mediterranean sea bass fillets (from 3 whole fish), I like branzino or orata, but you can use any white fish such as tilapia or red snapper.

Marinade

  • 2 tbsp olive oil
  • 1 large clove garlic, minced
  • 4 sun-dried tomatoes from the jar (use a little of the oil as well), chopped very finely
  • 3-4 tbsp finely diced fennel
  • 2 tsp lemon zest
  • 1½ tbsp finely chopped flat leaf parsley
  • 1½ tbsp finely chopped basil
  • 1½ tbsp balsamic vinegar
  • 1 tsp honey
  • ½ tsp Kosher salt

Sun Dried Tomato Coulis

  • 1 tomato, peeled, seeded and chopped finely
  • 1 clove garlic, minced
  • 1 tsp finely chopped basil
  • 1 tbsp finely chopped Italian parsley leaves
  • 6 sun dried tomatoes from the jar, sliced thinly
  • 2 tsp balsamic vinegar
  • 1 tbsp extra virgin olive oil
  • 1 tsp honey
  • juice from ½ lemon
  • 2 tbsp pine nuts
  • plenty of freshly ground pepper
DIRECTIONS
  1. Mix all the marinade ingredients together in a medium size bowl.
  2. In a small pot, mix together all the coulis ingredients and heat until hot but not boiling. Set aside.
  3. Remove the fish fillets from the fridge one hour before cooking. Place the fish in a large glass dish in a single layer, pour the marinade evenly over the fish, then flip the fish over so that the flesh is “sitting” on the marinade.
  4. Fifteen minutes before cooking, line a baking sheet with foil and place in the oven on the top rack. Turn the oven on broil.
  5. Warm up the coulis.
  6. When ready to cook the fish, remove the hot baking sheet from the oven, spray with non stick spray and lay the fish, skin side down on the hot sheet. Gather the remaining marinade ingredients and evenly distribute them on top of the fillets. Broil the fish for 5 mins. Remove from the oven, place on a platter and spoon the warm coulis over the center of each fish fillets.
Serves 6

THE GREEN GODDESS SPREAD

https://www.diabetescarecommunity.ca/diet-and-fitness-articles/recipes/the-green-goddess-spread/

This recipe is one of my absolute favourite spreads. Edamame are very high in fiber, have equal amounts of protein as it does carbs and are full of antioxidants! I use it as a dip on rice chips or as a fabulous spread on whole grain bread.  Add a tomato, some cucumber slices and some lettuce and voila….the greatest lunch ever!

 
INGREDIENTS salt for the boiling water 1 cup frozen shelled edamame beans ½ cup frozen sweet peas ¼ cup chopped chives (you can roughly chop them, they are going in the food processor) small handful of cilantro leaves 1 tbsp low sodium tamari or soy sauce 1-2 tbsp flax seed oil (nutritional value below reflects 2 tbsp flax seed oil) pinch of kosher salt 4-5 grinds of fresh pepper   DIRECTIONS
  1. In a pot of boiling water, add about 1 tsp salt. Add the frozen edamame beans to the boiling water and cook for 2 minutes. Add the frozen peas to the edamame in the pot and cook for another 3 minutes (a total cooking time of 5 minutes).  Strain.
  2. In the bowl of a food processor place the cooked beans and peas, chives, and cilantro leaves. Process until chopped. Add the tamari (or soy sauce) and flax oil. Process until chopped fine but not pureed.
  3. Transfer to a bowl, add salt and pepper, taste. This spread is fantastic on plain rice crackers or wasabi rice cracker.
Makes about 2 cups.

Toasted coconut and kale chips

https://www.diabetescarecommunity.ca/diet-and-fitness-articles/recipes/toasted-coconut-and-kale-chips/

The combination of kale and coconut goes well together and creates an unusual flavor that surprisingly packs a huge health punch. Be careful, this is totally addictive!

INGREDIENTS DIRECTIONS
  1. Preheat the oven to 350°F or 325°F convection, adjust the racks to the upper third and lower third of the oven.
  2. Cover 2 cookie sheets in tin foil.
  3. Chop or tear the kale into bite size pieces. Don’t use the hard rib in the center of each leaf.
  4. In a small bowl, mix together the tamari and vegetable oil.
  5. In a large bowl toss the oil mixture with the kale pieces and coconut flakes.
  6. Distribute the kale and coconut over the two prepared cookie sheets.
  7. Place the two sheets of kale/coconut in the oven, cook for 10-15 minutes, check the kale after 10 minutes (if you do not have convection, swap the sheets halfway through the cooking time.) It should be crispy and shriveled a little. The coconut will be lightly browned.
  8. As soon as you remove the sheets from the oven, sprinkle the kale and coconut with sea salt.
Serves 4

RED LENTIL SOUP

https://www.diabetescarecommunity.ca/diet-and-fitness-articles/recipes/red-lentil-soup/
INGREDIENTS   DIRECTIONS
  1. In a large pot, heat 3 tbsp oil over high heat until hot and shimmering. Add onion and saute until golden, about 4 minutes, and garlic and saute for 1 more minute.
  2. Stir in tomato paste, cumin, salt, black pepper and chili powder or cayenne, and saute for 2 minutes longer.
  3. Add broth, 1½ cups water, lentils and carrot. Bring to a simmer, then partially cover pot and turn heat to medium-low. Simmer until lentils are soft, about 30 minutes.
  4. Taste and add salt if necessary.
  5. Using an immersion or regular blender or a food processor, puree half the soup then add it back to pot (soup should be somewhat chunky).
  6. Stir in lemon juice when ready to serve.
Serves 8, 1 cup portions

Roasted fruit with vanilla essence

https://www.diabetescarecommunity.ca/diet-and-fitness-articles/recipes/roasted-fruit-with-vanilla-essence/

This is a delicious healthy dessert. The addition of a vanilla bean is so beautiful and intensifies the taste. Vanilla beans are usually found in small glass tubes at the cash register area of the grocery store or in the spice aisle. You can always use vanilla extract in its place.

INGREDIENTS DIRECTIONS
  1. Preheat oven to 375ºF.
  2. Place sugar in small bowl. Slice vanilla been in half lengthwise. With the back of a knife, scrape out seeds and stir into sugar (the seeds will be sticky and paste-like). Cut the bean in 2 inch pieces and add to the sugar vanilla mixture.
  3. Arrange the fruit in a large baking dish, sprinkle with lemon juice, spread the butter pieces everywhere and drizzle the sugar mixture over the fruit and scatter the pods through the fruit.
  4. Roast the fruit, brushing it occasionally throughout the cooking, until the fruit is tender and glazed (about 20-40 mins.) and the juices are thick and syrupy. If the syrup evaporates too quickly, add a little more water.
Make Ahead Tip: This can be prepared several hours or a day or so in advance and reheated in a warm oven, stirring occasionally. Makes 6 servings

PAN ROASTED BRUSSELS SPROUTS

https://www.diabetescarecommunity.ca/diet-and-fitness-articles/recipes/pan-roasted-brussels-sprouts/

This recipe is the epitome of “less is more.” Properly treated Brussels sprouts are the perfect vegetable addition to almost any meal. So easy and fast to prepare, you will love making these.

INGREDIENTS DIRECTIONS
  1. Heat a large frying pan over medium-high heat, and add olive oil. Add the brussels sprouts, spread evenly around the pan. Sprinkle with kosher salt. Cook undisturbed until browned on one side, about 4 minutes. Toss.
  2. Continue cooking until they are browned all over, another 3-5 minutes.
  3. Add about 3 tbsp water to the pan and cover partially. Let cook for another 5 minutes or until the sprouts are fork tender but not mushy. You may need to add more water if the water evaporates too early.
  4. Plate the brussels sprouts, sprinkle with lemon juice, pepper, chili flakes.

60 second overnight breakfast muesli

https://www.diabetescarecommunity.ca/diet-and-fitness-articles/recipes/60-second-overnight-breakfast-muesli/

I love this breakfast because I tend to avoid any extra higher level processing in the morning! Preparing a simple, healthy yet delicious breakfast in 60 seconds the night before, is something that starts my next morning off well! Also, chia seeds are amazingly nutritious, adding healthy fats, protein, iron, and fiber to your breakfast. They are a necessary part to this muesli because they break down and act as a thickening agent by absorbing the liquid; this is necessary for the texture of this overnight muesli to work. Note that the nutritional analysis does not reflect the optional morning toppings.

INGREDIENTS In the morning top it with (optional): Fresh berries Coconut flakes Chopped nuts Dried fruit DIRECTIONS
  1. Place the oats, chia seeds, milk, mashed banana, salt, vanilla or cinnamon in a medium bowl, stir to combine, place in fridge overnight. Do not cover.
  2. Wake up in the morning and give yourself a portion of the muesli. Top it with any of the above toppings (not reflected in the nutritional analysis) and EAT a healthy breakfast!
  3. Makes 4 servings (about 85g each, 1/3 cup)
  4. This will last in the fridge for 2-3 days (cover after the first night)

Turkey & white bean burgers

https://www.diabetescarecommunity.ca/diet-and-fitness-articles/recipes/turkey-white-bean-burgers/

These burgers are unlike most turkey burgers. Because of the addition of white bean, they are so moist and delicious. You can serve them on a bun (not reflected in the nutritional analysis) or wrapped in a lettuce leaf with a slice of tomato!

INGREDIENTS DIRECTIONS
  1. Combine the white beans, olive oil, and the garlic in a large bowl. Using a fork, lightly mash the beans and then mix them with the oil and garlic until blended.
  2. Add the red pepper, breadcrumbs, Worcestershire sauce, egg, and chives. Mix until blended.
  3. Crumble the ground turkey and add it to the bowl, along with salt and a generous amount of pepper.
  4. Gently mix with a fork or your hands until just blended; don’t over mix or the burgers will be tough.
  5. Shape the meat into four patties about 3-inches in diameter and ¾ inch thick (about 4oz. each).
  6. Heat a large nonstick skillet over medium heat, spray with non-stick oil spray. Cook the bottoms until browned, 4-5 mins.
  7. Flip the burgers and continue cooking until they are firm to the touch, about another 5-8 mins.
  8. Alternatively, you can grill them.

Almost egg white frittata with peppers, green and fresh herbs

https://www.diabetescarecommunity.ca/diet-and-fitness-articles/recipes/almost-egg-white-frittata-with-peppers-greens-and-fresh-herbs/

 INGREDIENTS

DIRECTIONS
  1. In a large non-stick fry pan, heat olive oil. Add onion slices, toss to coat, cook for 5 minutes (tossing several times), they should start to turn brown. Add red pepper slices, toss to coat, cook for 5-10 minutes (tossing several times).
  2. Add frozen edamame beans, toss to coat with the onions and peppers, add 2 tbsp water, toss, cook for 5 minutes.
  3. Add frozen greens, toss to mix with the veggies in the pan. Stir this mixture with a spatula or a wooden spoon. You will need to break up the frozen vegetable clumps as they defrost.
  4. Add the salt, toss to mix.
  5. In the meantime, in a medium size bowl, beat together the eggs and the egg whites. Add the cheese and herbs.
  6. Remove the veggie mixture to a heatproof bowl (don’t clean the pan), spray the pan with non-stick spray. Place pan back on the heat. Place the veggies back in the pan and gently spread them out evenly.
  7. Pour the egg mixture evenly over the veggies in the pan. Let cook undisturbed for 5 minutes. Then start loosening the sides of the frittata using a rubber spatula, do this by running the spatula around the sides and slowly getting further and further under the frittata.
  8. Cook the frittata on med-low heat for a total of 10 minutes or so, it should be about 70% cooked.
  9. Heat the oven to broil and adjust an oven rack to the top position.
  10. Place the pan under the broiler for about 2 minutes, and cook so that the top of the frittata can finish cooking and brown.
  11. Remove from the oven (remember the handle of the pan is very hot), let rest for 5 minutes or so. Using the help of the spatula, guide the frittata out of the pan and onto a round platter.
  12. Slice in wedges like a pie.
Make Ahead: Can make a day or 2 before and serve warmed up or at room temperature.

GREEN AND WHITE BEAN SALAD WITH CHERRY TOMATOES

https://www.diabetescarecommunity.ca/diet-and-fitness-articles/recipes/green-and-white-bean-salad-with-cherry-tomatoes/

This salad is so easy to prepare and it looks so beautiful too. White beans are full of fiber and so good for you. Serve this salad cold. It can be made well in advance and tastes great the next day too!

INGREDIENTS

For the white beans:

DIRECTIONS
  1. In a large serving bowl, combine the shallot, anchovies, vinegar, salt and pepper. Whisk in the olive oil until well combined. Add the drained white beans and tomatoes, toss to coat. This can be done well in advance.
  2. Cook the green beans in a pot of boiling water for about five minutes. Rinse the green beans in cold water and pat dry. When you are ready to serve the salad add the green beans to the rest of the salad and toss to coat.
Serves 10 If you have leftovers, it makes a great snack or addition to any meal, it will last in the fridge for 3-4 days.

Blue green power smoothie

https://www.diabetescarecommunity.ca/diet-and-fitness-articles/recipes/blue-green-power-smoothie/

This smoothie is a great way to increase your antioxidants and to make sure you get a healthy serving of greens every day. I feel clean when I drink this and it makes me feel like I’m doing something really nice for my body.

INGREDIENTS DIRECTIONS
  1. Place all ingredients in the blender (I measure the water first using the measurements on the blender and then place everything else in). Blend on high for a minute or so. You can add ice if you want it thicker and colder.
  2. Transfer to a large drinking glass, enjoy!
Cooks’ Tip: To make things a little faster in the mornings, I prepare single serving grab bags all at once. I portion 1 cup blueberries, ½ cup kale and 1 banana cut in pieces in each bag then and freeze the individual bags. In the morning all I have to do is fill the blender with the 1 cup liquid, dump in the contents of the grab bag and scoop the dry ingredients into the blender. Serves 1

Grilled fish tacos

https://www.diabetescarecommunity.ca/diet-and-fitness-articles/recipes/grilled-fish-tacos/

This fish recipe is so versatile, it can be served taco style (with tortilla reflected in the nutritional analysis) or simply as a whole piece of Mexican flavored grilled fish with salsa, guacamole (not reflected in the nutritional analysis). You can grill or broil the fish (see step 3 or 5 accordingly).

INGREDIENTS DIRECTIONS
  1. In a small bowl mix together chili powder, cumin, and garlic. Add chili in adobo with a little adobo sauce, mix again, add salt pepper and olive oil, and mix again until a loose paste is formed.
  2. Rub the mixture all over the fish. Let stand at room temperature for 30 minutes marinating or up to 4 hours in the refrigerator. If in the fridge, bring to room temp while you are preheating the grill (30 minutes).
  3. Preheat the grill to med-high. When the grill is hot, turn one part of the grill on low, leaving the other parts on med-high. The fish will go on the “low” part. Oil the grill grates well using spray or a damp paper towel dipped in vegetable oil and using togs, wipe the grill with the oiled paper towel (generously).
  4. Place the fish on the cooler oiled part of the grill and cook on each side until golden grill marks are formed. About 3-4 minutes per side. Remove to a cutting board and roughly chop.
  5. You can also place the fish on a lightly greased cookie sheet and place under the broiler for 8-10 minutes.
  6. Divide the tortillas into two stacks, wrap in foil and heat on grill for about five minutes.
  7. Each person should top their tacos with a serving of fish, some cabbage, a squeeze of lime, salsa, and guacamole (not reflected in the nutritional analysis) on the side or in the taco.
Serves 6 (2 tortillas with fish each) * I freeze the corn tortillas so that I don’t have to search for them the day I want them!

GRILLED MARINATED VEGGIES

https://www.diabetescarecommunity.ca/diet-and-fitness-articles/recipes/grilled-marinated-veggies/

Grilled veggies are so delicious when they are marinated AFTER they are grilled rather than before. I love having a big batch so that I can eat them as a snack or to top a salad with the next day. Sometimes I even make a grilled vegetable and hummous sandwich for lunch the next day.

INGREDIENTS DIRECTIONS
  1. Heat grill to med-hot.
  2. Slice eggplant into ¼ inch slices, salt and let stand until small beads of water appear. Rinse and pat dry. Grill until soft. Thinly slice into ½ inch strips lengthwise.
  3. Grill red peppers whole on all sides until nicely charred. Place in paper bag to steam or cover with plastic wrap for a few minutes; this will help to loosen the skin. Peel all charred skin and seed the peppers. Thinly slice peppers into ½ inch strips.
  4. Grill asparagus until lightly charred and softened.
  5. Slice onion in ½-inch rounds, grill until softened, do not burn.
  6. Grill hot chili pepper until charred on all sides. When cool, peel, seed and chop finely (this will be part of the dressing).
  7. Place all vegetables (other than chili pepper) on a platter
  8. Make a dressing by mixing together in a small bowl the chopped mint, parsley, garlic, chopped grilled chili pepper, olive oil, and vinegar. Season with salt and pepper.
  9. Drizzle dressing all over the veggies making sure it gets in and around the veggies.
If you have leftovers it will keep in fridge for several days. Serves 6 as a side veggie

PUREE OF CAULIFLOWER with a hint of sweet potato

https://www.diabetescarecommunity.ca/diet-and-fitness-articles/recipes/pure-of-cauliflower-with-a-hint-of-sweet-potato/
INGREDIENTS DIRECTIONS
  1. Preheat oven to 350°F.
  2. Cook the cauliflower florets in boiling salted water until very soft (mushy), about 15 minutes. Drain and put the cooked cauliflower back in the pot. Heat the pot to med high heat and toss the cauliflower around a few times, so that the residual liquid will evaporate.
  3. In the bowl of a food processor, puree the cauliflower and sweet potato together. Add the milk (dairy or soy) and egg. Puree until smooth. Season with salt and pepper. Mix again. If your food processor is too small, you may need to do this in batches. Transfer mixture to an oven proof casserole dish and reheat or re-cook in oven for 30 minutes before serving.
Serves 8 *to cook the sweet potato, poke the sweet potato all over with the prongs of a fork, then either cook in the microwave for about 10 minutes OR cook in a 400ºF oven for one hour. This step can be done up to two days in advance. Tip:  This puree can be prepared a day in advance, covered, refrigerated and reheated in the oven uncovered for 40 minutes at 350ºF.

Moroccan mint raspberry refresher

https://www.diabetescarecommunity.ca/diet-and-fitness-articles/recipes/moroccan-mint-raspberry-refresher/

INGREDIENTS

Tea Base: For The Refresher DIRECTIONS
  1. Steep the 3 tea bags in the 4 cups boiling water for 30 minutes, remove tea bags, add honey if using. Allow to cool in refrigerator for up to 1 week. Use when desired.
  2. When ready to make the Moroccan Mint Raspberry Refresher, pour cooled tea base into large pitcher, about 8-12 cups. Add mint leaves, raspberries, lemon slices ice cubes and fresh cold water to fill the pitcher.
  3. Serve chilled and enjoy!
Serves 8

Date and banana healthy snack cake

https://www.diabetescarecommunity.ca/diet-and-fitness-articles/recipes/date-and-banana-healthy-snack-cake/

This cake tastes decadent but really it’s full of healthy ingredients. When buying coconut oil, buy only virgin coconut oil. Regular (non-virgin) coconut oil is partially hydrogenised and contains trans fat. You can purchase all the ingredients at your local health food store or in the health food section of your grocery store.

INGREDIENTS DIRECTIONS
  1. In a small bowl, soak the dates in boiling water while you get the rest of the ingredients organized.
  2. Preheat oven to 350°F.
  3. Grease an 8-by-8 inch square pan. Line it with parchment paper up two opposite sides.
  4. In a large bowl, whisk together the flours, baking powder, soda, cinnamon and salt.
  5. Drain the dates but don’t squeeze them out. Add the bananas to the dates and mash together but leave a little chunky. Add maple syrup, oil, lemon juice and vanilla, and mix.
  6. Add the wet ingredients to the dry ingredients. Fold together using a spatula BUT do not over-mix (it’s ok to see a few dry spots of flour). The mixture will be very thick.
  7. Pour into prepared pan and spread gently to even out.
  8. Bake for 30 minutes or until toothpick inserted in the center of the cake comes out clean.
  9. Cool on a rack, flip over to remove from pan, remove parchment and slice into squares.
*Coconut oil is solid and hard. I put the whole jar in the microwave for about 1 minute to soften it before I scoop out ¼ of a cup, then I melt that. Slice into 25 squares NOTES: For a Gluten-Free Version: Replace the kamut flour with chickpea flour (and all the other ingredients should specify that there are gluten free and have no cross contamination). For a Nut-Free Version: Replace the almond meal with coconut flour or even all-purpose flour. You can replace coconut oil with vegetable or extra light olive oil. You can replace the tapioca flour with potato starch or rice flour.  

Flax seed sweet potato breakfast muffins

https://www.diabetescarecommunity.ca/diet-and-fitness-articles/recipes/flax-seed-sweet-potato-breakfast-muffins/
These muffins are so delicious that you won’t want to tell anybody how healthy they are! The addition of flax seed adds omega 3 fatty acids and the oat bran and sweet potato has so much fiber - this is a FABULOUS breakfast muffin.   INGREDIENTS
  • 1½ cup whole wheat flour
  • ¾ cup ground flax seed
  • ¾ cup oat bran
  • ½ cup brown sugar (if you are being extra careful, lessen the sugar a bit or use Splenda)
  • 2 tsp baking soda
  • 1 tsp baking powder
  • ½ tsp salt
  • 2 tsp cinnamon
  • 2 apples, peeled, cored and shredded*
  • 1 large sweet potato, cooked and peeled**
  • ¾ cup unsweetened almond milk or skim milk
  • 2 eggs, beaten (if you want you can put 4 whites)
  • 2 tbsp vegetable oil or melted coconut oil
  • 1 tsp vanilla extract
  DIRECTIONS
  1. Prepare 2 muffin trays (however, you will only need 18 cups) by spraying them with vegetable oil spray.
  2. Preheat oven to 350ºF.
  3. In a large bowl, combine all dry ingredients (flour through cinnamon).
  4. Mix the grated apple to the dry mixture. Make sure it is really mixed up (hands are the best tools) so that the apple shreds get coated with the flour mixture.
  5. In another bowl or the measuring cup that you are using to measure the milk, mix together the milk, eggs, oil and vanilla. Add the sweet potato, and make sure the sweet potato is well mixed into the wet mixture. Add this to the flour apple mixture. Mix well with spatula or wooden spoon without over mixing.
  6. Spoon into the prepared muffin tins.
  7. Bake for 15-20 minutes.
* I use my food processor to shred the apples, but you can use a standard box grater. **To cook the sweet potato: Using a fork, make a few holes in the potato. Microwave on high how 3-4 minutes, turn over and continue cooking for 2-3 minutes. Allow to cool and peel. ***You can replace the sweet potato with unpeeled raw grated zucchini, just don’t use the inside core or seeds and mix it with the apple and flour. Makes 18 muffins

Blackened rub for fish, poultry or beef

https://www.diabetescarecommunity.ca/diet-and-fitness-articles/recipes/blackened-rub-for-fish-poultry-or-beef/

I always make at least 4 times this recipe. It will last for about 1 year stored in a jar in your spice pantry. My favorite use for this rub is for salmon…if my opinion counts!

INGREDIENTS DIRECTIONS
  1. Mix all the spices together in a small bowl. Store in jar. Use as needed.
  2. Rub fish, poultry or meat lightly with olive oil.
  3. Use approximately 1 tbsp of mixture per pound of fish, poultry or meat.
  4. I usually broil or grill the protein with this rub.
Makes a little less than ½ cup of rub.

LENTIL AND BROWN RICE PILAF

https://www.diabetescarecommunity.ca/diet-and-fitness-articles/recipes/lentil-and-brown-rice-pilaf/
INGREDIENTS
  • 1 tbsp extra virgin olive oil
  • 1 small onion, finely chopped
  • 1 cup brown rice
  • 3 cups low sodium chicken/vegetable stock (you can use water if you wish)
  • ¼ tsp salt
  • Pepper to taste
  • ½ cup dry green/brown lentils
DIRECTIONS
  1. Heat oil in medium-sized pot over medium heat. Add onion, sauté until translucent, about 5 minutes.
  2. Add rice and sauté for 1 minute. Add salt and pepper. Add stock or water, cook over medium/low heat uncovered for 15 minutes.
  3. Add lentils, and cook for 30 minutes covered on low heat.
  4. Toss with a fork and serve!
Serves 8 (¾ cup servings) NOTE: This can be made in advance and reheated in the pot.  

Squash chips with herbed sea salt

https://www.diabetescarecommunity.ca/diet-and-fitness-articles/recipes/squash-chips-with-herbed-sea-salt/

These chips are so addictive, you would not believe they are actually healthy. I use the same herb salt mixture for eggplant slices, potatoes, fish and chicken!

INGREDIENTS DIRECTIONS
  1. Preheat oven to 375°F Convection or 400°F Regular. Arrange oven racks in the upper 1/3 and lower 1/3 of the oven.
  2. By hand, mix all the herbs, lemon zest, salt, garlic and olive oil together. Set aside.
  3. Slice the long end of the squash into ¼-inch rounds, slice each round in half. Slice the bulb end of the squash in half, scoop out the seeds and slice into ¼-inch slices.
  4. Line 2 cookie sheets with foil. Distribute the squash pieces evenly between the two sheets. Distribute the herb mixture equally between the two cookie sheets and toss the squash slices all around the mixture so that they are coated well. Lay the squash slices flat and spread them out.
  5. Place in oven and cook for 15 minutes. Remove from oven, flip the squash pieces over and place back in the oven, and cook for another 15 minutes. If you are using convection, no need to rotate sheets. If you are not using convection, rotate sheets so that the sheet that was on the top rack is now on the bottom rack.
  6. Enjoy hot or room temp. They are also great re-heated in a hot oven the next day!
Serves 6

SALAD IN A JAR

https://www.diabetescarecommunity.ca/diet-and-fitness-articles/recipes/salad-in-a-jar/
INGREDIENTS
  • 1 liter Mason Jar (or any jar the same size)
    For the dressing at the bottom:
DIRECTIONS
  1. Mix all the dressing ingredients first in the bottom of your jar - shake to mix.
  2. Layer the salad making sure you put the items at the bottom that can sit in the dressing. I like putting the tomatoes and the chickpeas at the bottom.
  3. Then put the tuna, egg or any protein you are using, then the quinoa. This should fill half the jar.
  4. The other half of the jar should be ALL VEGGIES. I always put the harder ones first such as the raw cauliflower, celery and carrot. Always add the lettuce last. Close the jar and pack for lunch (try to keep upright).
  5. Don’t shake until ready to eat
Serves 1 * I always make 1 cup of dry quinoa and once its cooked use what I need and use the rest for another time. It freezes well also. To make quinoa use 1 cup DRY UNCOOKED quinoa: Rinse 1 cup quinoa in a strainer, place in small pot. Put 1½ cup water into the pot with the quinoa. Bring to a boil over med-high heat. As soon as it boils, turn the heat to very low and cover the pot and cook for 15 minutes. Immediately remove from heat, remove lid and fluff the quinoa with a fork. Allow to cool and use as needed. NOTE - 1 cup DRY quinoa will make 3 cups cooked. For the Salad in a Jar single serving recipe, you will only need ½ cup COOKED quinoa, so you will have quite a bit of leftover cooked quinoa. Put it in your fridge, it will last 4 days or freeze it.

Fast and easy weekday chipotle chicken and black bean chili

https://www.diabetescarecommunity.ca/diet-and-fitness-articles/recipes/fast-and-easy-weekday-chipotle-chicken-and-black-bean-chili-2/
This chili is perfect for a fast weeknight meal. It comes together in under 30 minutes. It’s full of protein and no added fat!INGREDIENTS 1½ lbs ground chicken 3 (15-19 oz) cans black beans, drained and rinsed 1 14-oz can of tomatoes, chopped or ½ 28-oz can 1-2 small chipotle chilies from the can with the adobo sauce ½ red onion, finely chopped 1½ tbsp chili powder 2 tsp ground cumin Garnish and to serve • Tortilla chips • Finley chopped red onion • Cilantro • Limes • Ripe avocado, diced • Freshly ground pepper • Shredded cheese DIRECTIONS 1. In a large heavy bottomed pot, brown chicken. Using a wooden spoon, break up the meat as you brown it. Brown until it is no longer pink - about 5 minutes. 2. In the meantime, in a blender or food processor, puree the tomatoes, chipotle chilies and half the black beans. 3. Once the chicken is cooked, remove from the pot to a bowl (leaving the oil behind). 4. Add the red onion to the pot and sauté until soft and translucent, about 5 minutes. Add the chili powder and cumin, toast for 30 seconds or so. 5. Add the contents of the blender, to the pot. Put 1 cup water in the dirty blender, swish it around and add that water to the pot. Add the remaining black beans and the cooked chicken to the pot as well. 6. Cook for about 15-25 minutes on low partially covered. 7. Serve with a squeeze of lime, minced red onion, avocado, cilantro and tortillas (and shredded cheese if you like). Note: these garnishes are not reflected in the nutritional information. • If you want it a little heartier, serve over brown rice or quinoa. YUM! • Freezes well • If you want it a little thinner, add a little more water. Serves 8 1-cup servings

Jeweled orchietti pasta with squash and chard

https://www.diabetescarecommunity.ca/diet-and-fitness-articles/recipes/jeweled-orchietti-pasta-with-squash-and-chard/
INGREDIENTS 2 tbsp extra virgin olive oil 1 large vidalia onion, diced 1 small head cauliflower, cut into small florets 1 lb butternut squash, cut into small cubes* 1 small bunch of swiss chard, leaves only (no core), cut into bite size pieces 12 cherry tomatoes, halved 2 cloves garlic, minced ½ lb pasta, I like whole wheat orchietti (250g) (half of a standard 1 lb/454b bag or box pasta) 4 oz feta cheese   DIRECTIONS
  1. Heat olive oil over medium heat in a large frying pan (one that has a lid for later), add onion and sauté until soft and starting to brown on the edges, approximately 10 minutes.
  2. Add squash pieces, cauliflower and garlic. Toss to coat and sauté with LID ON, until soft, tossing a few times. About 15 minutes.
  3. Remove lid, add the tomatoes, and toss, cooking for 2-3 minutes.
  4. Add swiss chard, toss to coat, and cook until wilted (you may need to add the chard in batches allowing some to wilt before adding more), about 5 minutes.
  5. Boil pasta water, add pasta. Cook until al dente (or slightly chewy).
  6. When the pasta is ready, drain and SAVE A FEW CUPS OF PASTA WATER. Toss the pasta into the pan with the squash mixture, and add about ½ cup or so of pasta water. Cook tossing the pasta in the mixture and continue cooking pasta while adding pasta water as needed to finish cooking the pasta, (you will probably use about 1 cup total).   You can put the lid on to finish cooking the pasta - it will make it a little creamier. Turn heat off, add feta cheese. Serve.
Serves 4 *if you are using cut squash that comes in the box, you will need to cut each cube in 4 smaller pieces.

NOURISHING SOUP WITH LENTIL, SWISS CHARD AND SQUASH

https://www.diabetescarecommunity.ca/diet-and-fitness-articles/recipes/nourishing-soup-with-lentil-swiss-chard-and-squash/
INGREDIENTS 2 cooking onions, finely chopped 4 carrots, finely chopped 5 ribs celery, finely chopped 4 cloves garlic, smashed and chopped (not pureed) 1 tbsp kosher salt ¾ tsp curry powder (I use the hot one) ¾ tsp cumin ¾ tsp turmeric 3 strips of peel from a lemon 1 red pepper, finely chopped 1¼ -1½ lbs peeled butternut squash, cut into small cubes (from a 2 lb unpeeled squash) 3 cups dry lentils (I like lentils du puy, but brown or green is also fine) 8 cups low sodium chicken or vegetable stock 4 cups water 3-4 tbsp lemon juice 1 bunch kale, Swiss chard or 2 bunches of spinach, stemmed and cut in small bites (about 3½ cups)*   DIRECTIONS
  1. In a heavy bottomed soup pot, add oil. Add onion, carrots, celery and garlic. Add salt and sauté until onions are translucent. Add the red pepper and squash. Cook for 3-5 minutes.
  2. Add all the spices and lemon peel. Cook for 1 minute.
  3. Add the lentils, stir to coat.
  4. Add the stock and water and bring to a boil (uncovered). Turn heat to low and let simmer uncovered until the lentils are tender, about 45 minutes. At this point, you can puree some of the soup for texture. Put the pureed part back in the pot and carry on with step #5.
  5. Add the greens, cook until tender but still bright in color (about 10 minutes). Add the lemon juice, taste for seasoning and eat with warmth and love.
Makes a HUGE soup (about 20 cups or more) Serving size: 1 cup *In a pinch I use COOKING GREENS brand, they are found in the frozen section of the grocery store. I will use about 2-3 cups of frozen spinach, kale or the mixed greens. I use them straight from the freezer.

Grilled chicken shawarma with chopped salad and tahini sauce in lettuce cups

https://www.diabetescarecommunity.ca/diet-and-fitness-articles/recipes/grilled-chicken-shawarma-with-chopped-salad-and-tahini-sauce-in-lettuce-cups/
INGREDIENTS For the Marinade ¼ cup lemon juice ⅓ cup grape seed oil or any vegetable oil 2 cloves garlic, minced 2 tsp. paprika 1½ tsp. cumin 1 tsp. salt 1 tsp. turmeric 1 tsp. allspice 2.5 lb boneless skinless chicken thighs/boneless chicken breasts 1 head of Boston lettuce, washed and dried For the Tahini Sauce ¼ cup tahini paste ½ cup water ¼ cup lemon juice 1 small clove garlic Pinch of salt For the Salad 2 tomatoes, diced small 1 red pepper, diced small 1 cup small diced cucumber ¼ of a red onion, diced small 2 Tbsp. olive oil 2 Tbsp lemon juiceDIRECTIONS 1. Mix all marinade ingredients together in a bowl. Place chicken in zip top bag, pour marinade over chicken and marinate for several hours or overnight. 2. When ready to eat, remove chicken from the fridge and let it come to room temperature for 45 minutes to one hour. Remove chicken and discard remaining marinade. 3. Preheat grill to high. Then turn grill to medium and grill chicken on each side for about 7-10 minutes, depending on the thickness of the chicken pieces. If you have thin breasts, it can take as little as 4-5 minutes per side. 4. Remove from grill and slice into thin strips. 5. To Make the Tahini. Mix the lemon juice and water into the tahini paste until you have a smooth cream-like consistency. Add more lemon or water to thin it out. Add the garlic and salt. Stir. 6. To Make the Salad. Toss all the veggies together in a bowl, add the lemon, olive oil, salt and pepper. 7. On serving plates, spoon the chicken slices in the lettuce cups, add some of the Chopped Salad to the lettuce with the chicken and drizzle a tablespoon or so of Tahini Sauce over the salad and chicken. Serves 8

END OF SUMMER GAZPACHO

https://www.diabetescarecommunity.ca/diet-and-fitness-articles/recipes/end-of-summer-gazpacho/
INGREDIENTS 8 large ripe tomatoes, peeled, seeded and cut up (reserve the juice) 2 large red peppers, seeded and cut in chunks 2 large English cucumbers, peeled and seeded 1-2 med onions, cut in chunks - try to get Vidalia onions 3 large green onions, cut up ½ cup red wine vinegar ½ cup extra virgin olive oil 1½ cups canned tomato juice, more if needed Pinch of cayenne pepper, or to taste 1 tsp salt Pepper to taste ½ cup fresh dill, chopped   DIRECTIONS
  1. Place all the cut up vegetables in a large bowl, toss to mix up.
  2. In a med size bowl, whisk together vinegar, oil, reserved fresh tomato juice, canned tomato juice, and set aside.
  3. In a food processor fitted with the steel blade, in batches, pulse the mixed vegetables until the pieces are pea sized. Empty the processor after each batch is pulsed - add to an empty bowl. After all the veggies are pulsed, begin adding them back to the processor to even all the vegetable to the same consistency, and purée a little more this time. Add a little of the tomato juice mixture each time to the processor. Do the final mix in your large bowl. You should be able to see the pieces but not really tell what they are. The gazpacho should be pureed but not to a tomato juice consistency; it should still have a crunchy texture.
  4. Stir in the cayenne, salt, pepper and dill. Add more tomato juice if the soup needs thinning.
  5. Cover and chill for at least 4 hours; the flavors become more pronounced as it sits (even better...serve it a day or two later).
Serves 14 (1 cup serving size) Gazpacho nutritional content

Pressed quinoa salmon sushi

https://www.diabetescarecommunity.ca/diet-and-fitness-articles/recipes/pressed-quinoa-salmon-sushi/
INGREDIENTS 1 8x8 inch dish (I use a square pyrex) 2 cups uncooked white sticky sushi rice 1 cup uncooked black or red quinoa, cooked* (you won’t need all of it once it is cooked) ½ cup rice vinegar and a few extra tsp. 1 tsp. sugar 350g cleaned, skinned sushi grade salmon 2 tbsp light tamari 1 tsp chili sauce Mixed baby microgreens or sprouts A few tbsp of mixed black and white sesame seeds (optional)   DIRECTIONS
  1. Cook the sushi rice according to package directions. Once cooked, mix all the sushi rice and only 1 cup of the cooked quinoa together in a large bowl (I prefer using a wooden salad bowl for this).
  2. Heat together the rice vinegar and sugar (I do this in the microwave). Add half the mixture to the rice-quinoa mixture, stir gently to combine. Let absorb. Add the remaining half, mix. Place a damp towel on top of the rice and let cool completely (at room temp if you have time or in the fridge if you don’t).
  3. In the meantime, slice the salmon in thin slices and set aside in the fridge.
  4. Line the bottom of the pyrex dish with plastic wrap. Lay the salmon pieces overlapping one another over the entire bottom of the dish and then press all of the rice mixture evenly and firmly into the salmon slices, cover with another piece of plastic wrap. Place something heavy over the salmon-rice sandwich and refrigerate for at least 30 minutes.
  5. In the meantime, mix the tamari, chili sauce and the few extra teaspoons of rice vinegar together and set aside.
  6. Remove the pressed sushi from the fridge and remove the top layer of the plastic wrap. Flip onto a platter or cutting board. Remove the plastic wrap from on top of the fish and using a sharp long knife, slice into small pieces (about 25). Drizzle with the tamari/chili mixture and top with black and white sesame seeds and micro greens or sprouts.
Serves 6 (about 4 pieces) *To cook quinoa: Rinse quinoa in a strainer, put into a small sauce pan with 1½ cups water and 1 tsp. salt, and bring to a boil. Reduce the heat and simmer covered for 15 minutes, fluff with a fork and let cool with lid off.

Balsamic orange-glazed chicken breasts

https://www.diabetescarecommunity.ca/diet-and-fitness-articles/recipes/balsamic-orange-glazed-chicken-breasts/
INGREDIENTS ¾ cup cup fresh orange juice 3 tbsp brown sugar (preferably dark) 2 tbsp balsamic vinegar 2 tsp dry mustard 1½ tsp chopped fresh thyme ½ tsp kosher salt 6 boneless, skinless chicken breasts (6 oz each) Ground pepper for sprinkling     DIRECTIONS
  1. In a small saucepan, combine orange juice, brown sugar, balsamic vinegar, dry mustard, thyme, and salt, and boil for 5-7 minutes. Allow to cool. (To speed this up, pour into a flat dish.)
  2. When the marinade is cool, marinate the chicken piece in glaze for up to 24 hours (in fridge). Sometimes I don’t even marinate it.
  3. When ready to cook, set the oven rack to the 2nd from highest position, preheat to 400°F (regular bake - NOT CONVECTION).
  4. Place chicken into a roasting dish that is just big enough to accommodate the chicken. If there is too much room all the liquid will evaporate during the cooking. Pour any excess glaze over chicken; sprinkle with pepper. Let sit at room temp for 30 minutes.
  5. Roast on rack 2nd from the top for 20-25 minutes or until juices run clear.
  6. Drizzle with pan juices, serve immediately.
  Serves 6 Serving size = 1 6oz boneless chicken breast

Spaghetti squash with balsamic roasted tomatoes

https://www.diabetescarecommunity.ca/diet-and-fitness-articles/recipes/spaghetti-squash-with-balsamic-roasted-tomatoes/
Spaghetti squash with balsamic roasted tomatoes is delicious, filling and nutritious. It is surprisingly low in calories and carbohydrates. It is full of fibre, vitamin A and C. A fabulous replacement to pasta. And it pairs really well with roasted tomatoes!! INGREDIENTS 1 spaghetti squash, cut in half lengthwise 10 plum tomatoes cut in half lengthwise 1 tbsp extra virgin olive oil 1-2 tsp of balsamic vinegar ½ tsp Kosher or coarse sea salt Plenty of freshly ground pepper DIRECTIONS
  1. Preheat oven to 400˚F (I use convection roast but regular bake works fine too)
  2. Line a cookie sheet with tin foil; place the squash cut-side down on one side of the sheet. In a large bowl, toss the cut tomatoes with the oil, vinegar, salt and pepper; place cut side up on sheet next to squash.
  3. Roast for about 40 minutes OR until the squash is fork tender. It can take as little as 30 minutes or as much as one hour, just check it.
  4. When squash is cooked, remove sheet (with the tomatoes) from the oven, allow to cool until you can handle the squash. Carefully scoop squash from shell. You want to do this in the same direction as the fibres so that the spaghetti-like fibres remain intact. I use a fork for this. Place the squash in an ovenproof platter, spread it out and try to separate the fibres so that it looks like spaghetti noodles.
  5. Chop the tomatoes in about six pieces each; scatter on top and a little throughout the squash. Generously season with pepper.
  6. Place back in a 350˚F oven and cook for about 30 minutes or even up to one hour. This will dry out the squash and meld all the flavors - you can skip this part if you want, but I like it double cooked. It also makes it a great dish to entertain with because you can put it in a low oven (300˚F) and forget about it for a long while.
Serves 6, ½ cup per serving each Make Ahead Tip: The squash and the tomatoes can be made up to a day ahead. After step #4, refrigerate, covered. Then reheat for about one hour when ready to use. Or make it a few hours in advance, place on a platter (tomatoes too) and leave on the counter until you are ready to put back in the oven.

ARTICHOKE BRUSCHETTA

https://www.diabetescarecommunity.ca/diet-and-fitness-articles/recipes/artichoke-bruschetta/
I love this bruschetta topping. It is super easy, and healthy! I like to serve this on whole grain crackers or whole grain crostini. INGREDIENTS DIRECTIONS
  1. Using a knife, chop the artichokes finely. Transfer to a medium sized bowl.
  2. Stir in the olive oil, capers, arugula and red onion.
  3. Season to taste with plenty of freshly ground coarse black pepper. Serve on whole grain crackers or crostini (Note: nutritional value does not include crackers).
Makes about 2 cups Serves 15

The Perfect Chopped Salad

https://www.diabetescarecommunity.ca/diet-and-fitness-articles/recipes/the-perfect-chopped-salad/
INGREDIENTS   For the salad: 1 head romaine lettuce, chopped to bite-size 1 large ripe tomato, diced ½ English cucumber, diced ½ cup chick peas, canned, rinsed, and drained ½ cup chopped green onion, about 2 green onion ½ cup frozen peas or fresh peas, if available ¼ cup fresh mint, minced ½ cup Greek feta cheese, diced or crumbled   For the dressing: ¼ cup water ¼ cup apple cider vinegar 1 tsp. maple syrup 1 tsp. kosher salt Freshly ground pepper to taste 1 tsp. tamari or soy sauce ¼ tsp. dry mustard 1 clove garlic, minced ¼ cup flax oil ¾ cup sunflower oil or light olive oil   DIRECTIONS
  1. For the Dressing, puree everything in a blender or by hand (nutrition label, below on the left).
  2. For the Salad. Layer everything in order of the list of ingredients in a large glass bowl, just for looks (nutrition label, below on the right).
  3. To serve, pour ½ cup dressing over the salad and toss. The remainder of the dressing will last 1 week in the refrigerator.
  4. Add a little extra pepper to taste at the end.
Serves 8

Mashed chickpea egg and avocado toasts

https://www.diabetescarecommunity.ca/diet-and-fitness-articles/recipes/mashed-chickpea-egg-and-avocado-toasts/
Chickpeas are loaded with fibre and are a great source of plant protein. They have been shown to help lower bad LDL cholesterol as well as balance out blood sugar. The addition of the egg and extra protein and the avocado is a great source of healthy fat. INGREDIENTS 4 slices of whole grain bread ½ cup canned chickpeas, drained and rinsed 2 hard boiled eggs, peeled Juice squeezed from ½ lemon 1 ripe avocado Pinch cumin 1 tsp. hot sauce or pinch cayenne, optional Handful of fresh flat leaf parsley leaved, chopped, optional ⅛ tsp. salt pepper to taste DIRECTIONS
  1. Cut around the avocado lengthwise around the pit, separate the avocado into halves and scoop out the avocado flesh.
  2. Place chickpeas on a plate and mash using the back of the fork, do the same with the egg and avocado, gently stir the egg and avocado into the chickpeas (using the fork).
  3. Add all the flavorings; the lemon, cumin, hot sauce/cayenne, salt and pepper.
  4. Lightly toast the whole grain bread slices. Spread mixture evenly over the four slices of bread.

O.M.G. chickpea chocolate cookies

https://www.diabetescarecommunity.ca/diet-and-fitness-articles/recipes/o-m-g-chickpea-chocolate-chip-cookies/
INGREDIENTS 1¼ cup canned chickpeas, well-rinsed and patted dry with a paper towel 2 tsp vanilla extract ½ cup plus 2 tbsp (165 grams) natural peanut butter* ¼ cup (80 grams) honey 1 tsp baking powder ⅛ tsp of salt ½ cup (90 grams) semisweet or bittersweet chocolate chips   DIRECTIONS
  1. Preheat your oven to 350°F.
  2. Combine all the ingredients, except for the chocolate chips, in a food processor and process until very smooth, scraping the sides and the top to get the little chunks of chickpeas and process again until they're combined.
  3. Remove mixture to a bowl, and add chocolate chips. Mix.
  4. With wet hands, form into 1½” balls.
  5. Place on a parchment paper lined cookie sheet. If you prefer flatter cookies, press down slightly on the balls. They don't do much rising or spreading.
  6. Bake for 10-12 minutes or until slightly golden brown.
*If the peanut butter separates and the oil floats to the top, stir it before using.   Makes 24 small cookies Nutrition Analysis is based on one 28g cookie  

SMOKED PAPRIKA CRUNCHY SWEET POTATO FRIES

https://www.diabetescarecommunity.ca/diet-and-fitness-articles/recipes/smoked-paprika-crunchy-sweet-potato-fries/
INGREDIENTS *McCormicks along with many other specialty brands make this.  It can be found in the spice aisle of most grocery stores.  If you are unable to find it, simply use double the amount of regular paprika. DIRECTIONS
  1. Preheat oven to 375˙F CONVECTION
  2. Place a large pot with water over high heat to boil.  Add the potatoes, boil for 5 minutes, remove carefully and let drain on a paper towel until dry.
  3. In a large bowl, mix together the garlic, paprikas, oil and semolina.  Toss the potatoes into this mixture and spread on a 2 large cookie sheets, lined with foil and sprayed with oil spray.  Sprinkle with pepper, or you can do this at the end.
  4. Roast for 1 hour.
  5. Roast for another 20-30 or until dark in spots and crispy.
Serves 6

Whole roasted artic char with asparagus and tomato

https://www.diabetescarecommunity.ca/diet-and-fitness-articles/recipes/whole-roasted-actic-char-asparagus-tomato/
INGREDIENTS 1 whole arctic char (about 2-3 lb), cleaned* 1 large red onion, halved 1 large tomato, finely diced 1 lemon About 10 basil leaves, finely chopped (optional) About 15 cherry tomatoes 4 green onion, kept whole 1 bunch of asparagus, tough ends removed 3 tbsp of extra virgin olive oil, divided Freshly ground pepper to taste   DIRECTIONS
  1. Preheat oven to 400˚F. Place the rack in the center of the oven. Line a medium-size roasting pan with foil (unless you don’t mind washing the pan, then you don’t need to line it) and then line it with parchment, leaving an overhang.
  2. Make 4-5 diagonal shallow slits in the skin and flesh of the fish, season the fish inside and out with less than half of the pepper. Place the fish inside the parchment lined roasting pan,
  3. Slice half the onion into half moon slices and finely dice the other half. Distribute the sliced onion around the fish.
  4. In a small mixing bowl, mix together the diced onion, diced tomato, juice from half of the lemon, the chopped basil (if using) and pepper. Drizzle with some of the olive oil, mix this all up. Stuff this mixture inside the cavity of the fish.
  5. Place the cherry tomatoes all around the fish. Drizzle the whole thing with a little more of the olive oil (save a little bit), season with pepper, squeeze the other half of the lemon over the fish and tomatoes and place the two lemon halves in the roasting pan.
  6. Bake for 20 minutes, and remove from the oven. Place half of the asparagus on either side of the fish, nestle them in a little and drizzle with the rest of the olive oil, put the pan back into the oven and continue roasting for another 20-25 minutes. You know it is ready when the skin of the fish blisters a little and turns golden brown and the skin splits a little.
  7. Cut the flesh of the fish in sections and serve without the skin.
Serves 4 * I ask the fish monger simply to clean the fish and leave the head and tail, but you can have it deboned and still left whole, butterflied.

Portuguese churrasco chicken

https://www.diabetescarecommunity.ca/diet-and-fitness-articles/recipes/portuguese-churrasco-chicken/
INGREDIENTS DIRECTIONS
  1. In a medium-sized bowl, mix together the oregano, paprika, sugar, cayenne, cumin, salt and pepper.  Add the garlic, oil and vinegar.  Set aside until ready to use.  This mixture will last one week in the refrigerator.
  2. Coat the chicken with the mixture and let it sit at room temp for about 1 hour before grilling (this is enough marinating time or you can do longer).  Grill the chicken for about 5 minutes on the first side, flip and then repeat on the second side (or until the internal temperature of each chicken breast is 150˚F).
Serves 6 Make ahead tip:  Often I will mix the dry spices together in a mason jar and leave it in my spice area.  And when I want to use it I mix the garlic, oil and vinegar into it.

Chunky monkey ice cream

https://www.diabetescarecommunity.ca/diet-and-fitness-articles/recipes/chunky-monkey-ice-cream/
INGREDIENTS 1 frozen banana* ¼ cup milk** 2 dates, pitted 1 tbsp raw cacao powder, or unsweetened cocoa powder 1 tsp cinnamon ¼ cup pecans   Optional Toppings Chopped pecans Toasted coconut flakes Berries   DIRECTIONS
  1. Place the liquid in the blender first, then place everything else in the blender (not the optional toppings) and blend until smooth. I use my tamper to make sure everything gets pushed down. Remember, there is not a lot of liquid in this, so you will need to give the blender a little assistance.
  2. Scoop into bowls or glass cups and top with optional toppings.
Makes 2 servings (Note: The blender will blend better if you double the recipe and make 4 servings at a time, and you can freeze the servings you are not using. Simply put in serving dishes, cover and freeze.) *When my bananas are on their last legs (lots of spots but not black), I cut them into pieces (about 6 pieces each banana) and place on a lined tray and throw in the freezer. When the pieces are frozen, I place them into bags, ½ banana servings. Then I can use them in smoothies or for this treat. Freezing them in ½ banana servings makes it very usable! **May substitute non-dairy milk, almond or coconut beverage. Note: Nutritional analysis does not reflect optional toppings.

END OF SUMMER GRILLED CORN SALAD WITH BLACK BEANS AND TOMATO

https://www.diabetescarecommunity.ca/diet-and-fitness-articles/recipes/end-summer-grilled-corn-salad-black-beans-tomato/

INGREDIENTS

DIRECTIONS

  1. Heat the grill to medium.
  2. Cut the red onion in wedges so that some of the core is left intact.  This will hold the pieces together while you grill them so they don’t fall apart.
  3. Grill the onion until soft but not charred, flipping several times (about 10 minutes in total).
  4. Lay the corn on the grill and grill the corn all over until soft but not charred (about 10 minutes in total, turning every few minutes).
  5. Core the pepper and cut in several pieces, grill on both sides until soft but not charred, about 4 minutes a side.
  6. Let the veggies cool.  Stand the corn up on one end and slice the niblets off the cob, and place in a large mixing bowl.
  7. Cut the onions off the core and dice.  Cut the peppers into bite size pieces.  Add the onions and peppers to the bowl with the corn.  Remove ends from the green onions and dice the remainder.
  8. Add the beans, green onion, tomatoes, cilantro, jalapeno, cheese, oregano and salt to the bowl, and mix everything together.
  9. Drizzle mixture with lime and olive oil, and toss to mix.
  10. Serve right away or let sit for several hours.
Serves 8

Rhubarb strawberry chia spread

https://www.diabetescarecommunity.ca/diet-and-fitness-articles/recipes/rhubarb-strawberry-chia-spread/
INGREDIENTS 2 cups of 1-inch sliced rhubarb or 8 oz 2 cups cut up strawberries, about 16-20 or 8oz 2 tbsp water 4 tbsp chia seeds 2 tbsp honey Zest of 1 orange   DIRECTIONS
  1. Put the rhubarb and strawberries and water in a small pot and heat over medium high heat. Cook for 10 minutes with the lid on, stirring occasionally.
  2. Place this mixture in a blender and puree, leaving a little texture.
  3. Pour into a mixing bowl, add the chia, honey and orange zest, stir well. Let it stand for about 10 minutes or so, stir again and then place in a jar/container in the fridge.
  Makes about 2 cup 12 2-tablespoon servings *Nutrition information is for recipe prepared with rhubarb Lasts about 2-3 weeks in the fridge

BALSAMIC MAPLE BUTTERNUT SQUASH

https://www.diabetescarecommunity.ca/diet-and-fitness-articles/recipes/balsamic-maple-butternut-squash/
INGREDIENTS DIRECTIONS
  1. Preheat oven to 450˚F (or 425˚F convection roast).
  2. On a foil lined cookie sheet, toss the squash pieces with the oil, place in the oven and cook for 20 minutes or until starting to brown.
  3. In the meantime, in a small bowl stir together garlic, vinegar, and maple syrup or honey.
  4. Remove squash from oven, pour vinegar-garlic mixture over squash, toss gently, making sure that the pieces are not overlapping.
  5. Cook for another 10 minutes or until glazed, caramelized and fork tender.
  6. Remove from oven, transfer to a serving dish, sprinkle with mint.
  7. Serve!
Serves 8

Banana date breakfast cookies

https://www.diabetescarecommunity.ca/diet-and-fitness-articles/recipes/banana-date-breakfast-cookies/

I hesitate to use the word cookies and breakfast in the same sentence, but really these little (or big) nuggets are healthy enough for an on-the-go breakfast.

INGREDIENTS

DIRECTIONS
  1. Preheat the oven to 350˚F, line a cookie sheet with parchment.
  2. Mix together the oats, flour, flax, cinnamon, baking powder, baking soda and salt in a large bowl.
  3. In a separate bowl mix together the mashed banana, apple sauce, egg, oil, peanut butter, maple syrup or honey, vanilla. Add the date pieces, using the mixture to separate the sticky dates. Mix the banana mixture into the oat mixture (it will be thick).
  4. Scoop about ¼ cup lumps onto a parchment lined cookie sheet.  Flatten them a little on the top.  Bake for 15 minutes.
  5. Cool on a baking rack.
  6. Store in a sealed container for 4 days or freeze.
Serving 1 cookie Recipe makes 16 cookies

CLASSIC ISRAELI HUMMUS

https://www.diabetescarecommunity.ca/diet-and-fitness-articles/recipes/classic-israeli-hummus/
This hummus is incredibly creamy from the tahini.  Spread the hummus on a round plate, drizzle with olive oil and sprinkle with paprika if you like! INGREDIENTS For drizzle: 2 tbsp olive oil, paprika DIRECTIONS
  1. Place chickpeas and garlic into the bowl of a food processor fitted with a metal blade. Process until chopped.
  2. Add tahini, lemon juice, salt, cumin, cayenne powder, and mix.
  3. Drizzle in water. Process again. Add more water and lemon juice as needed to thin the hummus to desired consistency.
  4. Drizzle with olive oil and paprika.
Serves 10

BUTTERNUT SQUASH AND PEAR SOUP

https://www.diabetescarecommunity.ca/diet-and-fitness-articles/recipes/butternut-squash-pear-soup/
INGREDIENTS DIRECTIONS
  1. Heat large pot over medium heat. Add oil.
  2. Add diced onion, cook until translucent and beginning to brown on the edges, about 3-5 minutes.
  3. Add the curry powder, cayenne, cinnamon and cumin. Toss to coat. Cook for another minute or so.
  4. Add cut squash, potato, parsnip and pear. Sprinkle with the salt. Cook for about 10 minutes, tossing every once in a while.
  5. Add the stock and water. Bring to a boil over high heat. Once boiling, lower the heat to a simmer and cover with the lid. Cook for about 45 minutes or until the vegetables are soft.
  6. Allow to cool a little before pureeing. In batches, puree the soup. The best way to do this is with a good blender, but an immersion blender will work too. Don’t blend too long, or it will have a baby-food consistency, just blend until smooth. Leave a slight texture.
  7. As you go, add each batch to a heatproof bowl or another pot. Add the pepper, taste. At this point you can serve right away or cool and refrigerate or freeze.
Makes 12 - 1 cup servings

FASTEST CHICKEN VEGETABLE QUINOA SOUP

https://www.diabetescarecommunity.ca/diet-and-fitness-articles/recipes/fastest-chicken-vegetable-quinoa-soup/
If you don’t have plans to stay home all day and make your grandmother’s chicken soup, this is a delicious and nutritious alternative.  The addition of quinoa adds amazing texture and a ton of nutrition.  If quinoa is not your thing, boil up some egg noodles on the side and throw them into the soup before serving. INGREDIENTS DIRECTIONS
  1. Pat dry the chicken thighs.
  2. Heat the oil in a medium size soup pot over med-low heat.  When the oil is hot, add the chicken and cover the pot.  Cook for 10 minutes, turning once or twice.  The object is to steam the chicken not to brown it; you want to get rid of the pink color.
  3. Stir in the leeks and cover the pot and cook until the leeks begin to soften, about 5 minutes.
  4. Add the tomato paste, toss and cook for 30 seconds or so.  Add the carrots, parsnips, celery and cook until the veggies begin to soften, about 5 minutes.  Add the stock, water and salt and bring to a vigorous simmer over high heat.  Lower the heat, maintain a gentle simmer and cook uncovered for 45 minutes.  The chicken should be very tender and falling off the bone.  Remove the chicken and set it aside.  Allow the chicken to cool.
  5. While the chicken is cooling, rinse the quinoa well in a strainer and add the quinoa and the zucchini to the broth and cook for another 20-30 minutes.

Blueberry bran muffins

https://www.diabetescarecommunity.ca/diet-and-fitness-articles/recipes/blueberry-bran-muffins/
INGREDIENTS ¾ cup All Bran Cereal 1 cup skim milk 1½ cups oat bran ⅔ cup whole wheat flour ⅓ cup sugar 2 tsp. baking powder ½ tsp baking soda ¼ tsp salt ½ tsp cinnamon 1 ripe banana, mashed 1 egg, lightly beaten 2 tsp vegetable oil ½ cup unsweetened applesauce 1 cup fresh blueberries Cooking spray for the muffin tin or muffin tin liners   DIRECTIONS
  1. Preheat oven to 350˚F.
  2. Grease a 12-cup or 24 mini-cup muffin tin with oil spray.
  3. Mix the All Bran Cereal and the skim milk in a small bowl and let stand while you prepare the other ingredients.
  4. In a large bowl mix the oat bran, flour, sugar, baking powder, baking soda, salt, and cinnamon.
  5. In a small bowl, combine the banana, egg, vegetable oil, and applesauce. Stir in the All Bran mixture and blueberries. Stir this mixture into the dry ingredients, and mix ONLY until incorporated. DO NOT OVERMIX.
  6. Spoon mixture into prepared muffin tin. Bake for 20 minutes for the larger muffins or 15-18 minutes for the mini muffins. Bake until golden on top.
  7. Cool for 5 minutes in the tin. Remove the muffins and let cool on a wire rack.
  These muffins freeze well. Kids love them for their lunch box. Yield: 24 mini muffins or 12 regular size muffins NOTE: Nutritional analysis reflects regular size muffin   Kitchen Utensils Needed

The one and only cauliflower pizza crust with tomato, basil, spinach and smoked mozzarella

https://www.diabetescarecommunity.ca/diet-and-fitness-articles/recipes/one-cauliflower-pizza-crust-tomato-basil-spinach-smoked-mozzarella/
INGREDIENTS For the Crust 1 small cauliflower, florets only, 4 finely riced level cups* ½ cup/60gm spelt flour ½ cup/40gm almond meal/almond flour 1 egg, beaten ½ tsp garlic powder 1/2 tsp kosher salt ½ cup/60-65gm finely grated mozzarella cheese 2 tbsp olive oil   My Toppings About 1/2 cup shredded smoked mozzarella About 12 cherry tomatoes, quartered Big handful of spinach 10 basil leaves torn   DIRECTIONS
  1. Preheat oven to 500˚F and place the oven rack on the second from the lowest position. Heat a cast iron flat top sheet or a cookie sheet (lined with foil if you wish) in the oven as it preheats.
  2. Measure 4 cups of riced cauliflower* in a microwave safe bowl. Microwave on high for 4 minutes. Stopping halfway to toss. When cool enough to handle, squeeze the liquid out of the cauliflower using paper towels. Allow the cauliflower to cool a little before adding the egg and cheese.
  3. Add the two flours, salt, garlic powder and stir well. Add the egg and cheese and work the dough with your hands so that it is all evenly distributed.
  4. Carefully remove the sheet from the oven, place it down on a heatproof surface. Brush the sheet with the olive oil. Spread the cauliflower mixture in a large oval, making a lip, like a “pizza crust edge.” I will spread it as much as I can with my hands (it is hot), then sometimes put a piece of parchment on top of the flattened cauliflower and using a rolling pin, roll over the parchment to little to make it even thinner, then make a nice raised edge.
  5. Bake the crust without the toppings for 10 min, remove from the oven and sprinkle the crust (starting with the cheese) with all the toppings. Bake for another 8-10 minutes.
  6. Remove from the oven, let cool for a few min, cut and enjoy!
Makes 8 large pieces *to “rice” the cauliflower, place the florets in the food processor fitted with the steel blade. Pulse the cauliflower many times until it resembles rice.

FAST AND SIMPLE SESAME SNAP PEAS

https://www.diabetescarecommunity.ca/diet-and-fitness-articles/recipes/fast-simple-sesame-snap-peas/

INGREDIENTS

DIRECTIONS

  1. Cut the hard root end off each snap pea, and try to tear some of the tough fibers that come along with the end along the spine of the pea.  No need to cut the other end of the pea.
  2. In a large fry pan, heat oil over med heat until shimmering, add the chopped garlic.  Sauté for 20-30 seconds.
  3. Add the snap peas, toss into the oil and let cook tossing several times for about 3-5 minutes. They will soften a little but the idea is to keep them very crunchy.  Add the sesame seeds and toss for another minute or so.  Sprinkle with coarse salt and serve hot.
Serves 4

Deconstructed caesar salad

https://www.diabetescarecommunity.ca/diet-and-fitness-articles/recipes/deconstructed-caesar-salad/
This is my fast and easy weeknight salad recipe. Sometimes I use the cheese and sometimes I don’t. It is super easy to make, everybody loves it.INGREDIENTS Dressing INSTRUCTIONS
  1. Lay the lettuce leaves on a platter.
  2. Mix the dressing ingredients together in a bowl or measuring cup and drizzle over the leaves. You may not need it all, save it for a few days.
  3. Sprinkle the pepper over the dressed leaves.
  4. Sprinkle with the shaved parmesan cheese
Serves 4 *I’m not a big fan of washing lettuce. I buy the organic box of washed romaine leaves. You can also buy Green Giant Little Gem Lettuce Hearts (shown in the photo). **Parmesan reggiano can be shaved with a vegetable peeler or you can purchase shaved parmesan in the grocery storeNUTRITIONAL CONTENT FOR SALAD (WITHOUT DRESSING)NUTRITIONAL CONTENT FOR SALAD DRESSING

Korean steak tacos with cucumber salad and sumac pickled onions

https://www.diabetescarecommunity.ca/uncategorized/korean-steak-tacos-cucumber-salad-sumac-pickled-onions/
I love tacos and I love Korean flavors.  This combination is irresistible and a fantastic easy summer entertaining dish!    Both skirt steak and flank steak need a long marinating time and need to be sliced super thin once cooked.  The sumac in the pickled onion adds a fantastic red color and sour flavor that goes really nicely in the tacos.  You can buy sumac in a ground powder form in a specialty shop.  It comes from the sumac bush found in the Middle East. The berry is dried and ground, and it has a lemony flavor. INGREDIENTS STEAK MARINADE CUCUMBER SALAD SUMAC PICKLED ONIONS DIRECTIONS
  1. Blend all the marinade ingredients together in a blender or food processor, leave a little texture.
  2. Place in a zip top bag, place steak in the bag. Marinate overnight or up to 2 days.
  3. When ready to grill...
  4. Remove meat from fridge for 1 hour before grilling
  5. To make the Cucumber Salad: Slice the cucumber in half in the width so that it is easier to handle, take each half and slice into half or quarters in the length. Now slice into thin pieces, I do this on a slicer so I get super thin slices.  Place slices in a medium sized mixing bowl.  Drizzle the vinegar and oil over the cucumbers, mix and toss together very well.  Sprinkle with sesame seeds, and toss.  Let marinate at room temp for about 30 minutes or longer before serving.  Toss again before serving.
  6. To make the Sumac Pickled Onions: mix the onions in a medium bowl with the red wine vinegar and sumac.  Mix well and let sit for 30 minutes or so.
  7. Turn your BBQ to high for 10-15 minutes. Once the grill is hot, turn it down to medium.
  8. Remove the steak from the marinade and shake off excess.
  9. Place the meat on the grill. Cover the grill and cook the steak for about 4 minutes, flip and repeat.
  10. Allow steaks to “rest” (lightly covered in foil) on cutting board for 10 minutes before slicing.
  11. Slice thinly on an angle, serve a few pieces on soft corn tortillas, topped with Cucumber Salad, Sumac Pickled Onions and cubed avocado.
Serves 6

CACIO E PEPE ZOODLE TOMATO PASTA

https://www.diabetescarecommunity.ca/diet-and-fitness-articles/recipes/cacio-e-pepe-zoodle-tomato-pasta/
This recipe is a take-off of the traditional Italian ‘Cacio E Pepe’ or cheese and pepper pasta recipe.  I am adding tomatoes and using spiralized zucchini in place of noodles.  I have a small inexpensive home spiralizer that looks like an oversized pencil sharpener (pictured below).  You can find it at any kitchen store.  Many grocery stores are now carrying spiralized zucchini and other vegetables.  It is a fabulous pasta alternative!  I serve this alongside a simple grilled or roasted chicken breast, lean steak or grilled shrimps. INGREDIENTS DIRECTIONS
  1. In a large sauté pan or wok, heat oil until shimmering.
  2. Add cherry tomatoes and cook on medium high for 3-4 minutes.
  3. Add the spiralized zucchini and pepper and toss for 1-2 minutes. Turn heat off.
  4. Add lemon zest and cheese, and toss.
  5. Serve immediately.

Serves 2

Fall simple salad with pears and seeds

https://www.diabetescarecommunity.ca/diet-and-fitness-articles/recipes/fall-simple-salad-with-pears-and-seeds/
INGREDIENTS For the Dressing DIRECTIONS
  1. Mix the Boston and the radicchio lettuce in a large bowl, refrigerate.
  2. Heat a small frying pan to medium, and place the pumpkin seeds to toast for 5 minutes, tossing a few times. Sprinkle with the brown sugar and toss for about 2-3 minutes.  Remove from heat and transfer seeds to a piece of parchment paper to cool.
  3. Make the Dressing. In a small bowl mix all the dressing ingredients together. Set aside.
  4. When ready to serve, toss the pears through the lettuce leaves and dress the leaves with all the dressing, sprinkle with pepper and place on a large platter or individual plates. Sprinkle with toasted seeds.
Serves 6

Apple dutch baby

https://www.diabetescarecommunity.ca/diet-and-fitness-articles/recipes/apple-dutch-baby/
INGREDIENTS ¾ cup 1% milk 3 large eggs 2 tbsp sugar 1 tsp vanilla extract ¼ tsp salt ½ tsp ground cinnamon ½ cup whole wheat flour ¼ cup all purpose flour 1 tbsp unsalted butter 2 apples peeled, cored thinly sliced 1 tbsp brown sugar   DIRECTIONS
  1. Pre-heat oven to 425˚F.
  2. Whisk milk, eggs, sugar, vanilla, salt, and cinnamon in large bowl until well blended.
  3. Add flour and whisk until batter is smooth. Set aside.
  Cast Iron Pan Method:
  1. Heat a 12-inch cast iron skillet over medium heat. Melt butter in the pan, and when the butter stops foaming, add the apples, arranging in an overlapping single layer. Let cook undisturbed on low for about 10 minutes, toss the apples around a little and cook for another few minutes.
  2. Pour batter over apples in cast iron pan and sprinkle with brown sugar. Put the pan in the oven and bake until pancake is brown, and puffed, about 15-20 mins.
  Pyrex dish Method:
  1. Place butter in an 8x8 inch glass baking dish (Pyrex). Place dish in oven until butter melts, about 5 minutes. Remove dish from oven. Place apple slices in overlapping rows on top of melted butter in baking dish. Return to oven and bake until apples begin to soften slightly and butter is bubbling and beginning to brown around edges of baking dish, about 10 minutes.
  2. Pour batter over apples in baking dish and sprinkle with brown sugar. Put the pan back in the oven and bake until pancake is brown, and puffed, about 15-20 mins.
Serves 4

Green goodness salad bowl with kale and brussel sprouts

https://www.diabetescarecommunity.ca/diet-and-fitness-articles/recipes/kale-and-brussel-sprouts-salad/
This salad bowl is packed full of nutrient-rich dark green vegetables.  Recent studies have shown that two tablespoons of apple cider vinegar with a meal even as part of a vinaigrette salad dressing will dramatically reduce the spike in blood glucose that comes after a meal. Add a piece of grilled fish or chicken to make this a great wholesome choice for a lunch or dinner. INGREDIENTS For the Dressing (see second nutrition facts label below) DIRECTIONS
  1. Mix all the dressing ingredients together in a jar, shake and set aside. It will last one week in the fridge.
  2. Mix all the shredded kale, shredded Brussels sprouts, and green onion. You can do this ahead and use all week (store in a zip top bag).
  3. When ready to eat, add the avocado and apple.
  4. Toss with one tablespoon of dressing per serving, add your protein if using and enjoy!
Makes 12 salad servings *shred the Brussels sprouts on a mandolin or use the thinnest shredding blade of a food processor.    

Roasted turkey breast with root vegetables, pan gravy and Israel couscous

https://www.diabetescarecommunity.ca/diet-and-fitness-articles/recipes/roasted-turkey-breast-root-vegetables-pan-gravy-israeli-couscous/
INGREDIENTS 1 boneless (skin on) turkey breast HALF (it should be around 3-4 lb) 4 cups cubed (bite-sized) root vegetables (the mixture should be 1 cup sweet potatoes, 1 cup squash, 1 cup turnip, ½ cup parsnip, ½ cup carrot) ½ lemon 2 tbsp olive oil 1 tsp kosher salt 1 tbsp paprika 1 tbsp garlic powder Pepper to taste 3-4 sprigs of fresh thyme, left whole or roughly chopped 3-4 sprigs of fresh rosemary, left whole or roughly chopped 2-3 shallots, roughly chopped 3-4 stalks of celery from the inside of the celery - the small ones with the leaves, roughly chopped (including the leaves) 1 HEAD garlic, cloves separated, skins left ON 1 cup cherry tomatoes, washed 1 cup no sodium chicken broth plus a little water during the cooking 2 cups Israeli Couscous or a small shape whole wheat soup pasta, cooked according to package directions in water   DIRECTIONS Allow the turkey breast stand at room temp for about 1 hour before cooking. Preheat oven to 375°F
  1. Put the 4 cups of cubed root vegetables in a medium size pot, cover with water by a few inches and bring to a boil. Cook the vegetable for 10 minutes, the vegetables will be only partially cooked, drain, set aside.
  2. In a small bowl, make a paste with the olive oil, paprika, garlic powder, salt and pepper, set aside.
  3. Place the turkey breast inside a large roasting pan - you will dress the turkey right in the roasting pan so that all the excess spices and herbs fall into the dish rather than a work surface.
  4. Squeeze and rub lemon half all over turkey (keep the squeezed lemon half). Discard any seeds. Leave the lemon half in the roasting pan.
  5. Rub the olive oil and spice mixture all over the turkey separating the skin from the meat in order to get the spice mixture under the skin.
  6. Stuff the thyme and rosemary under the turkey and some under the skin as well. Place the previously squeezed half lemon under the turkey. The turkey should be in the pan, flattened out with the skin side up.
  7. Add the chopped shallots, celery, garlic cloves and cherry tomatoes to the bottom of the pan.
  8. Scatter the partially cooked root veggies around the turkey breast and in and around the tomatoes and garlic.
  9. Add the stock to the bottom of the roasting pan.
  10. Cook for 1¼ -1½ hrs or until the meat thermometer reads 160°F in the breast (the skin should be golden brown). Baste the turkey every 20 minutes with drippings; add a little water if needed.
  11. Once cooked, remove from the oven, remove turkey from the pan onto a cutting board and let rest, tented with foil for about 10 minutes. Separate the vegetables from the pan drippings or jus, and reserve.
  12. Slice the turkey breast crosswise on an angle in ¼-½ inch slices.
  13. Serve on a platter with the couscous as a bed for the turkey and the vegetables around the slices and the jus on the side.
Serves 8 Cooks Note: When I have a larger crowd for dinner I cook 2 turkey breasts in the same pan - I double everything. If your pan is not big enough, you can use a large cookie sheet. Make Ahead Tip: You can prepare the whole thing in advance except rubbing the turkey with the lemon. One hour before cooking, take the turkey breast out of the fridge and rub with lemon and let sit at room temperature for the hour before cooking.

Coconut curry shrimps with ginger and lemongrass

https://www.diabetescarecommunity.ca/diet-and-fitness-articles/recipes/coconut-curry-shrimps-ginger-lemongrass/
INGREDIENTS 2 pounds large (16-20 size) shrimps, peeled and deveined 3 tbsp olive oil 1 yellow onion, diced small 3 cloves garlic, smash and chopped A 1-inch piece of fresh ginger, peeled and minced 1 stalk of lemon grass (*see note at the bottom) 2 tbsp curry powder 1 can of light coconut milk ¼ cup water Juice of 1 lime ½ tsp dried chili flakes or 1 whole long red chili, optional a few shakes of tabasco, optional 1 bunch of basil, leaves only 2 handfuls of fresh baby spinach   To Serve 1 jalapeno, finely chopped handful cilantro leaves, roughly chopped 2 green onion, sliced in rounds 1 lime, cut into wedges 2 cups cooked brown or mixed grain brown rice, (measure after cooking)   DIRECTIONS
  1. Heat a heavy duty fry pan or cast iron pan over medium high heat. Add half the oil. Add the shrimps and cook for 2-3 minutes on each side or until they are opaque. Remove from the pan to a plate, set aside.
  2. Add the remainder of the oil. Add the onion and sauté until translucent and golden, about 5-7 minutes. Add the garlic, ginger and lemongrass, sauté for another minute or two. Add the curry powder, mix into the onion mixture, cook for another minute.
  3. Add the coconut milk. Add the water to the empty can of coconut milk, swish it around the can and dump that water into the pan with the coconut milk, let it boil, add the lime juice, salt, chilis, tabasco. Let the sauce boil and reduce for about 6-7 minutes. Taste the sauce, add more, chilis or lime to taste. Add the basil and spinach. Let the sauce thicken so that it coats the back of a spoon, about 3-4 minutes.
  4. Add the shrimps back to the pan, let cook for 2-3 minutes. Transfer to a serving dish and garnish with chopped jalapeno, cilantro, green onion.
  5. Serve with the cooked rice and lime wedges.slat
Serves 6 *Lemongrass is very easy to find in a regular grocery store in the vegetable section. Cut the root end off the lemongrass and then cut the lemongrass where the white part meets the greener part (you only use the white part), discard the root end and the darker part. Slice the lemon grass piece in half in the length and remove the outside two layers of the lemongrass (this part is too tough), and discard. Then chop the white part very finely. You can freeze any unused stalks of lemongrass, chopped or left whole.

The last stop trail bar

https://www.diabetescarecommunity.ca/diet-and-fitness-articles/recipes/last-stop-trail-bar/
I’ve been working on the perfect trail bar on and off for years. No refined sugar, just the right crunch and chew (and no banana, that is just personal). Friends... HERE IT IS! If you have a scale, use it and follow the weight measurements. INGREDIENTS Dry Nut and Seed Mixture 1½ cup/170 grams large flake oats ½ cup/85 grams raw almonds 2 tbsp/30 grams raw sunflower seeds 2 tbsp/25 grams raw pumpkin seeds 2 tbsp/25 grams raw sesame seeds ¼ cup/40 grams dried, sugar-free, unsulfured cranberries 4 medjool dates, pitted 3 tbsp/25 grams coconut flakes 2 tbsp/20 grams chia seeds 2 tbsp/25 grams hemp hearts 2 tbsp/20 grams whole (or ground) flax seed 1 tbsp/10 grams poppy seeds 1½ cups/35 grams puffed quinoa ¼ tsp flaked sea salt (I use Maldon salt)   Wet Mixture ½ cup plus 2 tbsp./175 grams tahini ½ cup/165 grams honey 2 tbsp/25-30 grams coconut oil   DIRECTIONS
  1. Preheat oven to 325˚F, line a cookie sheet with parchment paper. Also line a square pan (8*8 or 9*9) with parchment, overhanging on all sides.
  2. Place the oats and almonds on the cookie sheet. Place them in the oven for 5 minutes, remove and add the sunflower, pumpkin and sesame seeds to the tray (don’t mix them, keep them separate) and cook for another 10 minutes (so that the oats and almonds have a total of 15 minutes).
  3. Let them cool a little, put them in the food processor with the dates and cranberries, pulse them a few times so that everything gets chopped a little, and remove to a large bowl. Add the remainder of the Dry Nut and Seed Mixture ingredients to the bowl, and mix well.
  4. In a small pot, melt together on medium-low heat the wet ingredients, whisking to make it smooth, about 4-5 minutes (it does not need to boil).
  5. Pour the hot tahini mixture over the nut and seed mixture and using gloved hands and a spatula, mix the hot tahini mixture into the nut and seed mixture until it is uniform. Pour the mixture into the prepared pan and press it firmly into the pan. Place in the fridge for a couple of hours to firm up. Lift the parchment/bars out of the pan and cut into 30 squares or bars.
  6. Store in the fridge or freezer.
Makes 30 bars

Kale, radicchio, lentil, honeyed walnuts and pear salad

https://www.diabetescarecommunity.ca/diet-and-fitness-articles/recipes/kale-radicchio-lentil-honeyed-walnuts-and-pear-salad/
This salad is so delicious served as a first course or as part of a larger meal. It is delicious as leftovers as well. You can shred the kale, cook the lentils, make the dressing and cook the walnuts all a few days ahead.INGREDIENTS   For the Walnuts Dressing DIRECTIONS
  1. For the Walnuts: Preheat oven to 350˚F. On a parchment lined cookie sheet drizzle the walnuts with the honey, cayenne, salt and water. Toss to combine and bake for 12 minutes.
  2. To Cook the Lentils: Bring a small pot of water to boil, add the lentils and cook for 15 minutes. Let cool.
  3. Make the Dressing: Combine all the Dressing ingredients in a small jar and shake. Set aside.
  4. In a large bowl, drizzle the oil over the shredded kale and massage it for 1 minute until the kale has softened. Mix in the radicchio, lentils and sliced pear and add all of the dressing, toss to combine. Transfer this mixture to a serving platter and distribute the walnuts all over the salad; do the same with the cheese.
Serves 6

Chicken scallopini with mushrooms, tomatoes and spinach

https://www.diabetescarecommunity.ca/diet-and-fitness-articles/recipes/chicken-scaloppini-with-mushrooms-tomatoes-and-spinach/
This is the perfect do-ahead chicken dish that feeds a crowd and pleases everyone!INGREDIENTS DIRECTIONS
  1. Prepare a large flat surface with parchment paper and place the potato starch on one side of the paper. Lay the chicken pieces on the rest of the parchment and season both sides with salt and pepper.  Dip each seasoned piece of chicken in the potato starch and shake off the excess.
  2. Have a large oven safe serving dish near the stove. Heat a heavy duty pan over medium high heat, add about 1 tbsp of olive oil, and place 3-4 pieces of chicken in the pan. Do not crowd.  Cook for about 2 minutes on each side, and remove to the serving dish (NOTE: you do not need to cook it all the way through, it will cook as it sits).  Repeat with more oil and more chicken until all the chicken is browned.
  3. Add remaining oil to the pan, add the mushrooms, a pinch of pepper and sauté until shrunken, and browned, and remove them from the pan and add them to the dish with the chicken.
  4. Add the garlic to the pan, and cook until lightly browned. Add the tomatoes, season with a pinch of pepper, add the spinach, and sauté until wilted. Add this mixture to the dish with the chicken.
  5. Add the wine to the pan, let reduce for a minute, scraping up any brown bits at the bottom of the pan and add the chicken stock. Let cook for 3-5 minutes (it should boil), and add the lemon juice. Pour this mixture over the chicken and arrange the vegetables around the chicken in a presentable way.  Serve right away or cool and refrigerate covered overnight. Let come to room temperature for at least one hour before reheating and then reheat in a 300-400˚F oven (depending on what else is in the oven) until heated through, about 30 minutes.
SERVES 8

Salmon trout with spiralized zucchini, asparagus and tomato en papillote

https://www.diabetescarecommunity.ca/diet-and-fitness-articles/recipes/salmon-trout-with-spiralized-zucchini-asparagus-and-tomato-en-papillot/
Baking fish in parchment allows for the flavours to really concentrate.  The steam helps to make a perfect sauce and the cleanup is minimal!  I often make this when I need an easy dinner for 2 or 4 people.INGREDIENTS DIRECTIONS
  1. Preheat oven to 400°F.
  2. On the work surface, lay a sheet of parchment paper lengthwise. The piece of parchment should be about 4 times the length of the fish
  3. Using the lower half of the parchment paper, lay down the spiralized zucchini (this will be the “bed” for the fish). Tuck about half the tomatoes slices and half the red chili rounds in the zucchini noodles. Drizzle with 1 tbsp of the oil, about 1 tsp of the balsamic, sprinkle with salt and pepper.
  4. Lay the fish fillet on top of the zucchini and tomato bed.
  5. Drizzle a small amount of the oil on the fish and season with half of the salt and pepper.
  6. Distribute the remainder of tomatoes, red chili rounds and all the asparagus spears on top of the fish.
  7. Drizzle with the remainder of the oil, balsamic vinegar, salt and pepper.
  8. Fold the upper half of the parchment paper over the vegetable/fish mound (you should leave enough space around the food to allow the air to expand and circulate). Fold parchment paper over the fish, and fold the edges of the paper over several times, being sure to seal the contents inside (you can staple the folds at the top to seal the contents). Place the package on a cookie sheet and bake for 20-25 minutes.
  9. Cut the package open and either slide the contents onto a plate or serve directly from the open parchment.
Serving Suggestion: I like to serve this over a bed of brown rice, quinoa, or millet Serves 4

Super green super seed salad

https://www.diabetescarecommunity.ca/diet-and-fitness-articles/recipes/super-green-super-seed-salad/
INGREDIENTS 1 cup dry quinoa, cooked 12 leaves of kale, ribs removed, leaves chopped finely* ¼ cup finely chopped chives* ¼ cup finely chopped cilantro* ¼ cup finely chopped mint* 2 carrots, shredded* 1 cup broccoli florets, finely chopped* ½ cup mixed sprouts ½ cup mixed seeds (flax, chia, hemp, raw sunflower seeds and raw pumpkin seeds)   Dressing ½ onion ½ cup grapeseed oil ⅓ cup unseasoned brown rice vinegar 2 tbsp water 2 tbsp minced ginger 1 very small stalk celery from the interior of the head 1 tbsp low sodium soy sauce 1 tbsp honey ½ tbsp lemon juice ½ tsp sea salt Freshly ground pepper to taste   DIRECTIONS
  1. In a large mixing bowl mix together quinoa, kale, chives, cilantro, mint, carrot, and broccoli.
  2. To Make Dressing: combine all ingredients in a blender and blend until smooth.
  3. Add about ¾rs of the dressing, toss. Add sprouts and seed mixture, toss lightly.
*NOTE: I chop all the herbs, kale and broccoli together in the food processor. I use the grater blade for the carrot. Makes 10 servings To cook quinoa: Rinse quinoa in a strainer, put into a small sauce pan with 1½ cup water and bring to a boil. Reduce the heat and simmer covered for 15 minutes. Fluff with a fork and let cool with lid off.

Watermelon, feta, tomato and cucumber I-love-summer-salad

https://www.diabetescarecommunity.ca/diet-and-fitness-articles/recipes/watermelon-feta-tomato-and-cucumber-i-love-summer-salad/
INGREDIENTS 2 cups/12 oz 1-inch diced seedless watermelon cubes 10 cherry tomatoes, halved 2 baby cucumbers, cut into half moons 3 ounces feta cheese, cut into small cubes 6 mint leaves, slivered 3 tbsp extra virgin olive oil 2 tbsp red wine vinegar 1 tbsp lemon juice Plenty of freshly ground coarse black pepper ¼ tsp kosher or coarse sea salt   DIRECTIONS
  1. Gently toss the watermelon cubes with the tomatoes, cucumbers and feta cubes.
  2. Drizzle with olive oil, red wine vinegar, and lemon juice.
  3. Sprinkle with salt and pepper.
  4. Arrange salad on a platter or individual plates.
  Serves 6

Grilled salmon with summer cherry salsa

https://www.diabetescarecommunity.ca/diet-and-fitness-articles/recipes/grilled-salmon-with-summer-cherry-salsa/
INGREDIENTS   For the Cherry Salsa 6 cherries (or 1 small peach cut into small cubes) 4 cherry tomatoes, cut into quarters and then half again 1 tbsp minced red onion ½ of a jalapeño, slivered 4 mint leaves, slivered 2 tsp extra virgin olive oil 2 tsp lemon juice ⅛ tsp of sea salt Plenty of freshly ground black pepper   For the Salmon 2 6-ounce fillets of salmon, skin on 2 tsp olive oil ¼ tsp sea salt Plenty of freshly ground black pepper Zest of 1 lemon   DIRECTIONS
  1. For the Cherry Salsa: Remove the seeds from the cherries by pressing down on the cherry with the flat side of a knife, the seed will come loose. Remove the pit. Then cut each cherry in quarters.
  2. In a small bowl, mix the remaining ingredients with the cut cherries (or peaches).
  3. Preheat the grill to high and grease the grill well (I use grill spray).
  4. For the Salmon: Rub the oil on the salmon. Season the salmon fillets with salt, pepper and the lemon zest.
  5. Place the salmon fillets on the grill, turn the heat to med-low and close the lid. Cook the salmon for 12 minutes.
  6. Remove from the heat and place each fillet on a plate and top each fillet with half of the cherry salsa.
Serves 2

Fall harvest healthy apple crisp

https://www.diabetescarecommunity.ca/diet-and-fitness-articles/fall-harvest-healthy-apple-crisp/
Every year when the leaves change colour, the air gets colder and the layers get heavier, I crave a specific warm dessert that signifies all the cozy feelings this changing season brings. Unfortunately, in usual hibernation-fashion, cozy usually means carb-y. This crisp truly showcases the sweet, warm flavours fall has to offer, but without all the usual guilt. I use an assortment of apples to achieve an array of flavours and textures, and a mixture of oats and nuts to achieve a healthier crisp.INGREDIENTS For the Apples For the Crisp Topping For the Greek yogurt (to dollop per serving) DIRECTIONS
  1. Preheat the oven to 375˚F
  2. For the Apples Peel the apples and using a paring knife, slice the apples right off the core in thin uneven pieces. (I am not a fan of coring the apples and then slicing them into wedges on a cutting board, I find the apples do not cook as well, I prefer thin slicing them right off the core and leaving the core behind.)
  3. In a large mixing bowl toss the apples with the lemon juice. Sprinkle with the cornstarch or arrowroot, sugar, cinnamon and salt, toss.  Place apple mixture in a medium size shallow baking dish, about 2-quart (smaller than a lasagna dish), about 10-inch by 9-inch/8-inch by 8-inch, or even smaller.
  4. Make the Crisp Topping: In a medium size mixing bowl mix together the oats, almond flour, toasted pecans, sugar, cinnamon and salt.  Using your fingers, mix in the butter or coconut oil, massaging it into the dry mixture.  Scatter this mixture on top of the apples in the baking dish.
  5. Bake for 60-75 minutes or until the apples are bubbling and the toping is golden.
  6. To Serve: Serve warm in individual bowls dolloped with Greek yogurt sprinkled with cinnamon and a drizzle of honey.
SERVES 8 *I use 2 Granny Smith, one Honey Crisp, one Pink Lady and one Spartan, but choose what you like, as long as you use two Granny Smith and do not use Macintosh. ** I place the whole pecans in a zip top bag and smash them with the back of a fry pan to chop them, then I place them in a dry fry pan and cook them on low heat until they are fragrant and toasted. This takes about 10 minutes.

Ridiculously easy pumpkin soup

https://www.diabetescarecommunity.ca/diet-and-fitness-articles/diabetes-diet-articles/ridiculously-easy-pumpkin-soup/
INGREDIENTS 2 tbsp olive oil 1 onion, diced 1 clove garlic, minced 3 cups of pureed pumpkin, from a 796 ml can or fresh cooked pumpkin 3 1/2 cups low sodium vegetable or chicken stock 1/2 cup canned light coconut milk (reserve some of the remainder of the can for a drizzle on each bowl) 1 tbsp pure maple syrup ½ tsp sea salt Heaping ¼ tsp black pepper ¼ tsp cinnamon ¼ tsp chili powder, optional   DIRECTIONS
  1. Heat oil over medium heat in a medium size pot, add onion, sauté until softened and translucent, about 5 minutes. Add garlic, sauté for 30 seconds.
  2. Add the rest of the soup ingredients, bring to a simmer and cook for 5-10 minutes.
  3. Blend using an immersion blender or transfer to a blender and mix until smooth.
  4. Distribute the soup between 4 bowls, drizzle approximately one teaspoon of coconut milk over each bowl
Makes 6 cups, 4 servings

Quick and easy chia pudding

https://www.diabetescarecommunity.ca/diet-and-fitness-articles/quick-and-easy-chia-pudding/
INGREDIENTS ¼  cup whole chia seeds 1 tbsp of honey or maple syrup 1 cup unsweetened almond milk 1 ripe banana, mashed, optional ¼ cup shredded unsweetened coconut   DIRECTIONS
  1. Stir ingredients together, let stand at room temp for 5-10 minutes, stir again using a fork, breaking up the chia clumps and then transfer to 4 individual 4-ounce mason jars or serving containers.
  2. Refrigerate for at least 1 hour before using.
  3. Store in the fridge for up to 4 days.
  Makes 4, ½ cup servings

Oatmeal with apple and walnuts

https://www.diabetescarecommunity.ca/diet-and-fitness-articles/recipes/oatmeal-with-apple-and-walnuts/
INGREDIENTS ½ cup dry oats ½ small apple chopped 2 tbsp chopped walnuts cinnamon (optional)   DIRECTIONS
  1. Prepare oats with water according to package directions.
  2. Add chopped apple and walnuts.
  3. Sprinkle with cinnamon if desired.
Makes 1 serving

Avocado toast

https://www.diabetescarecommunity.ca/diet-and-fitness-articles/recipes/avocado-toast/
INGREDIENTS 2 slices whole grain or rye toast 2 eggs, poached or sunnyside up (cooked to your liking) ¼ small avocado, mashed Salt and pepper to taste   DIRECTIONS
  1. Toast bread.
  2. Prepare eggs to your liking.
  3. Spread mashed avocado on toast. Add eggs. Sprinkle with salt and pepper to taste.
Makes 1 serving

Turkey kale meatballs

https://www.diabetescarecommunity.ca/diet-and-fitness-articles/recipes/turkey-kale-meatballs/
INGREDIENTS 1 pound of ground turkey 500g bag frozen kale (about 2 cups)*, defrosted and liquid squeezed out 1 large clove garlic, minced 1 tbsp tomato paste ¼ tsp sea salt ½ tsp paprika ¼ tsp medium-grind black pepper 2 tbsp olive oil for the pan   DIRECTIONS
  1. Cover a prep sheet or tray with parchment paper. Heat a cast iron or stainless steel sauté pan on low heat.  Make sure the pan has some sort of lid (it does not have to be a match but something that will work).
  2. In a large mixing bowl, mix together the garlic, tomato paste, salt, paprika and pepper. Add the kale and mix well.  Add the turkey and mix well.
  3. Shape into 16 medium size balls.
  4. Heat the olive oil in the pan and place the turkey balls in the oil, raise the heat to medium and fry on one side for about 2-3 minuses, flip and repeat. Add 2-3 tbsp water to the pan and immediately cover the pan and cook for 8 minutes.
  5. Eat the meatballs on their own or serve in your favourite tomato sauce (nutritional analysis does not include sauce).
Makes 16 meatballs   *I usually defrost the frozen kale by leaving it out at room temperature for about 1 hour, or you can put it in the microwave, just make sure it is cooled before adding it to the turkey.

Greek salad

https://www.diabetescarecommunity.ca/diet-and-fitness-articles/recipes/greek-salad/
Greek salad is the perfect accompaniment to any meal. It is super easy to prepare and simple in flavours, so it goes with almost anything. Remember…never put your tomatoes in the fridge – it ruins the flavour and texture.

INGREDIENTS

DRESSING

DIRECTIONS

  1. Add tomatoes, cucumber, onion, olives and feta cheese to a medium-sized bowl.
  2. Add dressing and enjoy!
Makes 2 servings

White fish puttanesca

https://www.diabetescarecommunity.ca/diet-and-fitness-articles/white-fish-puttanesca/

INGREDIENTS

DIRECTIONS

  1. If you have the time, bring the fish to room temperature for 45 minutes before cooking it.
  2. Preheat the oven to 300˚F (see note at the bottom).
  3. Season the fish fillets with salt and pepper.
  4. Heat a large oven-safe fry pan (I like cast iron) over medium high heat. Add half the oil. (see note at the bottom if you do not have an oven-safe pan).
  5. Add the chopped garlic and cook for 10-15 seconds. Add the tomatoes and cook for 1 minute.
  6. Add the olives and red pepper flakes or chili pepper. Cook for an additional 5 minutes.  Remove this mixture from the pan to a heat-proof bowl and set aside.
  7. Return the pan to the stovetop over high heat and add the remainder of the oil. Add the fish to the pan, flesh side down (if there is skin on the fish).  Sear the fish on one side for 2-3 minutes.  Flip the fish to the second side and cook for 1-2 minutes.  Add the tomato mixture back to the pan and place the pan in the oven for 10 minutes or until the fish flakes.
  8. Serve hot.
Serves 4. Note: 300˚F may seem low to you but the residual heat from the fry pan in combination with the low oven heat, will “poach” the fish gently until it is fully cooked through. If you do not have an oven safe pan, cook the fish on the first side for 5-6 minutes on medium heat, flip the fish, add the tomato mixture back to the pan and cook the fish on the second side for an additional 5-6 minutes.

Chickpea tofu stir fry with spinach, zucchini and lemon

https://www.diabetescarecommunity.ca/diet-and-fitness-articles/recipes/chickpea-tofu-stir-fry-with-spinach-zucchini-and-lemon/
INGREDIENTS 4 tbsp extra virgin olive oil, divided 1 medium size cooking onion (about 1 cup diced) 1 14 oz can chickpeas, drained and rinsed 1 450 gram package of firm or extra firm tofu 2 small zucchini, diced into ½ -1 inch cubes 2 cups of baby spinach ½ tsp salt Freshly ground pepper to taste Zest and juice of ½ lemon DIRECTIONS
  1. Cut the tofu and place it on a paper towel and carefully blot it dry a little.
  2. In a large sauté pan, heat 2 tbsp oil over medium high heat until shimmering.
  3. Add onion and chickpeas and toss with oil. Sprinkle with some of the salt.  Spread mixture over the pan so that the contents are in one layer.  Let cook undisturbed for 3-4 minutes, toss and repeat.  Do this a few times so that parts of the chickpeas develop a crust and become golden brown in spots (the onion will be the same).  Remove to a heatproof dish.
  4. Put the pan back on the heat. Add 1 tbsp more of the oil and add tofu, toss to coat, and cook undisturbed until the tofu has crusted. Toss and allow the tofu to brown on a few sides.  Sprinkle with a little salt.  Remove the tofu and add it to the dish with the chickpeas and onions.
  5. Put pan back on the heat, add the remainder of the oil, add zucchini, toss to coat, and sprinkle with a little salt. Cook until the zucchini is golden brown all over, about 3-4 minutes. Add the spinach by handful and toss until the spinach has wilted a little.
  6. Add the chickpea, onion, tofu mixture back to the pan with the zucchini and spinach, and gently toss through.
  7. Add the zest and juice from one half of a lemon. Gently toss.
  8. Remove to plater, sprinkle with pepper.
Serves 4.

Sheet pan greek chicken with loaded veggies

https://www.diabetescarecommunity.ca/diet-and-fitness-articles/recipes/sheet-pan-greek-chicken-with-loaded-veggies/
INGREDIENTS 6 chicken thighs, bone in skinless 1 head garlic 6 Brussels sprouts 1 green or yellow zucchini 1 acorn squash*, unpeeled or 1 sweet potato, peeled or half of each ¼ cup black kalamata olives 1 lemon, cut in wedges 1 red onion, cut into wedges   For the marinade: ¼ cup extra virgin olive oil ¼ cup lemon juice 1 tbsp red wine vinegar 1 tbsp dried oregano 2 cloves garlic, minced 1 tsp sea salt Plenty of freshly ground pepper   *Nutritional Facts Table is based on using the acorn squashDIRECTIONS
  1. Mix all the marinade ingredients, except 1 Tbsp olive oil together in a zip top bag.
  2. Place the chicken pieces in the zip top bag with the marinade. Let marinade for 45 minutes at room temperature or up to 12 hours in the fridge.  If you are marinating it in the fridge, bring it to room temperature for 45 minutes before cooking it.
  3. When you are ready to cook the chicken, preheat the oven to 375˚F Convection Roast, Convection or 400˚F Regular Bake.
  4. Cut the head of garlic in half through the circumference so that the cloves of garlic are exposed on both halves, place on a cookie sheet.
  5. Cut the Brussels sprouts in half, place on the sheet. Cut the zucchini into 4-5 large chunks on an angle.
  6. Cut the acorn squash or sweet potato in wedges. Place on the sheet.
  7. Place the olives, lemon wedges and red onion wedges on the sheet.
  8. Drizzle 1 tbsp olive oil all over the veggies, toss to coat and arrange on the sheet so that all the veggies are mixed up.
  9. Arrange the chicken pieces amongst the vegetables.
  10. Pour the marinade in the bag all over the chicken and veggies.
  11. Sprinkle everything with plenty of freshly ground pepper.
  12. Bake for 50-60 minutes or until the chicken is a deep golden brown.
Serves 4

Simple marinated cucumber salad

https://www.diabetescarecommunity.ca/diet-and-fitness-articles/recipes/simple-marinated-cucumber-salad/
INGREDIENTS 1 English cucumber ¼ cup unseasoned rice vinegar 1 tsp sesame oil 1 tsp honey ½ tsp kosher salt 1 tbsp toasted black and white sesame seeds   DIRECTIONS
  1. Using a knife, slicer on a food processor or mandolin, slice the cucumber into 3mm slices. Place slices in a medium size mixing bowl.
  2. Drizzle the vinegar and oil over the cucumbers. Sprinkle with the honey and salt, mix and toss together very well. Sprinkle with sesame seeds, toss.  Let marinate at room temperature for about 30 minutes, or longer, before serving.  Toss again before serving.
Serves 8

Quick and easy arugula, grilled peach, goat cheese and honeyed pecan salad

https://www.diabetescarecommunity.ca/diet-and-fitness-articles/recipes/quick-and-easy-arugula-grilled-peach-goat-cheese-and-honeyed-pecan-salad/
Ripe and beautiful in season, peaches are the perfect accompaniment to a first, second or third course.  Grilling them brings out the flavour and natural sugars.  If you are firing up your grill for dinner, then why not add peaches to your meal. If you don’t want to use grilled peaches in a salad, try grilling peach halves and serving them with yogurt for dessert.  You won’t need to add any sweetener since grilling the peaches brings out their natural sweetness, making for a perfect end to a meal!

Ingredients

For the Pecans For the Salad For the Dressing

Directions

  1. For the Pecans: Preheat oven to 300˚F.  Line a cookie sheet with parchment paper. On the prepared cookie sheet, toss the pecans with the honey and olive oil.  Bake for about 25 minutes, tossing several times during the cooking process.  All the honey should be absorbed but not crystallized.  Remove from the oven and let cool.
  2. Grill the Peaches: Prepare the grill. Heat grill to medium high heat.  Halve and pit the peaches. Run a sharp knife along each peach's seam to halve them. Remove the pit and cut each half in half so that the peaches are quartered.  Spray the grill with non-stick cooking spray
  3. Grill the peaches, over medium heat, for 4 to 5 minutes. Flip the peaches and cook until tender, another 4 to 5 minutes. Flip the peaches and grill until the skins are charred and the peaches are soft, 4 to 5 minutes more.
  4. For the Salad: Place the arugula in a large bowl or platter, drizzle with balsamic vinegar, olive oil and salt. Toss. Add the pecans, crumbled goat cheese and grilled peaches (1/2 grilled peach per serving).
Serves 8

Perfect grilled eggplant rounds with tahini, chopped tomato and pomegranate

https://www.diabetescarecommunity.ca/diet-and-fitness-articles/recipes/perfect-grilled-eggplant-rounds-with-tahini-chopped-tomato-and-pomegranate/
Ingredients 2 small eggplants ½ tsp sea salt for sprinkling 3 tbsp olive oil for brushing on the eggplant 1 cup cherry tomatoes, sliced in quarters ¼ cup pomegranate seeds, optional 2 tbsp chopped fresh Italian parsley 2 green onions, chopped   Tahini Sauce: 2 tbsp tahini (sesame seed paste) 2 tbsp cold water, more as needed Pinch of sea salt   Directions
  1. Preheat the grill to med high.
  2. Slice eggplants in ¼-½ inch rounds and lay out on a large sheet of paper towel.
  3. Sprinkle with sea salt and let stand for 20 minutes, the eggplant will sweat. Blot the slices dry with paper towel.
  4. Brush each slice of eggplant with olive oil on both sides.
  5. Grill the slices for about 5 minutes per side (the slices should be golden brown on each side and a little crispy, you may need more time).
  6. In the meantime, make the tahini sauce by whisking the tahini with the water and salt, add more water to thin it out. It should be the consistency of heavy cream.
  7. On a platter, lay the eggplant rounds in a single layer.
  8. Sprinkle the chopped tomatoes, pomegranate seeds, parsley, and green onion. Drizzle with the tahini sauce.
  9. Serve warm or at room temperature.
Serves 6

High protein cookie dough balls

https://www.diabetescarecommunity.ca/diet-and-fitness-articles/recipes/high-protein-cookie-dough-balls/
INGREDIENTS 1 cup oats ½ cup ANY nut butter, I use tahini (sesame seed paste) when I want to keep it nut free 2 tbsp unpasteurized honey ¼ cup vanilla protein powder ¼ cup shredded unsweetened coconut (and more for rolling the balls in - optional) ¼ cup chocolate chips or raisins   DIRECTIONS
  1. Mix all the ingredients together in a large bowl. Pinch off a small amount and roll into a ball about the size of a walnut.
  2. Roll into additional shredded coconut, if desired.
  3. Refrigerate and store in the fridge.
Makes about 30 balls.

Brown rice sushi bowl with sweet and crispy salmon

https://www.diabetescarecommunity.ca/diet-and-fitness-articles/recipes/brown-rice-sushi-bowl-with-sweet-and-crispy-salmon/
This is a one-bowl meal that you will crave! Ingredients Chili Sauce (makes about 2/3 cup) For the Salmon Garnish Directions
  1. Make the rice: Rice Cooker Method: Cook brown rice in the rice cooker according to rice cooker settings.  Stovetop Method:  In a saucepan, bring 4 cups water and a large pinch of salt to a boil. Add the rice, lower the heat, and cover the pan. Simmer for 25 minutes.
  2. In the meantime: Make the Chili Sauce. In a small pot, heat the water, maple syrup or honey, apple cider vinegar, garlic, low sodium soy sauce, and chili flakes. Bring to a simmer and cook for 5 minutes.  In a small bowl, mix together the cornstarch and 1 tbsp water until the cornstarch has dissolved.  Pour this into the hot chili garlic sauce, stir, and let boil for 10 additional minutes. Turn off the heat so it will thicken. You will only need 4 tbsp of this sauce; store the remainder in the fridge.  It will keep for a week or two.
  3. Cut the salmon into large cubes (about 2 inches).
  4. As soon as the rice is ready, open the lid of the rice cooker or pot and place the shredded kale on one side of the pot and place the seaweed (if using) on the other side. Close the lid of the rice cooker or pot, and let steam for 10 minutes.
  1. For the Salmon: In the meantime, cook the salmon. Coat the cubes in cornstarch and shake off the excess.  Heat a large frypan over medium-high heat.  Add oil.  Add the salmon cubes, cook undisturbed for 3-4 minutes. Flip each piece to the opposite side and repeat, flip the cubes to one more side, and cook for 1-2 minutes, flip again, and cook for 1-2 minutes more.  Add 4 tbsp of Chili Sauce to the hot pan with the salmon. Let it bubble, tossing the salmon cubes in the sauce.
  1. To Serve: Spoon 1 cup rice into each bowl and top with salmon cubes, steamed kale and nori.  Sprinkle with sesame seeds, green onion and avocado.
Serves 4      

Black pepper tofu bites

https://www.diabetescarecommunity.ca/uncategorized/black-pepper-tofu-bites/
Tofu is the perfect vehicle for any flavour to shine on.  This dish makes for a fun pass around appetizer. Serve the bites skewered with a toothpick at your next cocktail party.  Or if you want to get fancy, you can pass it served in individual serving spoons. If you want to make a meal out of this, try making a side of soba noodles with it. They will soak up all the pan juices from the tofu, making for a perfect dinner. Cut the tofu in large cubes so that the centre stays pillowy and soft while the outside gets crispy and delicious. I have made this exact recipe with scallops or shrimp, always delicious. I haven’t done so, but I’m sure chicken strips would be fabulous too.   ingredients 1 package (about 400grams) of firm or extra firm tofu ½ cup cornstarch 3 tbsp canola oil, divided 3 cloves garlic, minced 1½ tsp minced fresh ginger 2 tsp dark brown sugar 3 tbsp low sodium tamari 1½ tbsp mirin or cooking sherry 2 small green onions, chopped in small rounds 1 long red chili, chopped in small rounds (or a bird chili) 1½ tsp freshly ground black pepper   directions
  1. Cut the tofu into large cubes (about 1-inch), about 32 cubes per package. Lay the cubes on a paper towel and let them dry a bit. Toss them in the cornstarch, shaking off excess.
  2. Heat a large fry pan. Heat half the oil until the oil is shimmering. Add half the tofu to the pan. Let it cook undisturbed until the first side is golden brown, then flip, brown second side, and repeat until most sides are brown. Remove from pan to a plate. Add the rest of the oil and remainder of the tofu and repeat with second batch, remove.
  3. Add garlic and ginger to the pan and cook until fragrant, less than one minute. Sprinkle brown sugar into the pan, toss quickly for 30 seconds or so. Add the tamari and mirin, allow to bubble and reduce for a minute.
  4. Add back the tofu cubes and carefully toss with liquid in the pan. Shut the heat off and continue tossing until well coated.
  5. Sprinkle with green onion, chilies and pepper.

Turkey barley soup

https://www.diabetescarecommunity.ca/diet-and-fitness-articles/recipes/turkey-barley-soup/
Ingredients 2 tbsp olive oil 3 leeks, white and light green parts, coarsely chopped ½ lb button mushrooms, sliced 2 medium carrots, peeled and coarsely chopped ½ cup pearl barley 3 large garlic cloves, minced 1 tsp salt 2 skinless turkey drumsticks or 1 turkey leg (thigh and drumstick intact)* 8 cups no-sodium chicken broth 2 tbsp chopped Italian parsley ¼-½ tsp pepper or to taste *you will often find turkey drumsticks or legs in the freezer section at your butcher.  Leave it to defrost in the fridge overnight before you want to use it.  You can replace the turkey legs with 8 skin-less, bone-in chicken thighs.Directions
  1. Heat the olive oil in a large soup pot over medium heat. Add the leeks and sauté until they have softened, 5-7 minutes.  Stir in the mushrooms, carrots, barley, garlic and salt and sauté 1 minute longer.
  2. Add the turkey legs, sauté for a minute or two, add the broth, bring to a boil and reduce the heat to low.
  3. Cover and simmer for about 1½ hours until the barley is tender but not mushy.
  4. Remove the turkey legs. When cool enough to handle, remove the meat from the bones.  Shred the meat into bite size pieces and return to the pot.  Turn the heat off.
  5. Stir in the parsley, add the pepper to taste and enjoy!
  6. Freezes well.
Serves 8

Weeknight mushrooms in parchment

https://www.diabetescarecommunity.ca/diet-and-fitness-articles/recipes/weeknight-mushrooms-in-parchment/
Cooking mushrooms in parchment is easy and the steaming method of cooking in parchment helps to retain all the delicious mushroom flavour.  Use a variety of mushrooms if possible.  You can buy a package of mixed mushrooms at most grocery stores.INGREDIENTS A stapler *Use whatever herbs you have on hand - I like thyme and rosemary.  You can use a little dried thyme and rosemary leaves (not powdered).DIRECTIONS
  1. Preheat oven to 400˚F.
  2. On the work surface, place an 18-24-inch sheet of parchment paper lengthwise.
  3. Using the lower half of the parchment paper, place the mushrooms down in a circle .
  4. Sprinkle with salt, pepper, and herbs. Distribute the butter pieces evenly around the mushrooms.  Drizzle the balsamic vinegar over the mushrooms.
  5. Fold the upper half of the parchment paper over the mushrooms (you should leave enough space around the food to allow the air to expand and circulate). Starting from the upper right corner, make a fold in the parchment, continue folding along the half moon with overlapping folds.  You should be making very tight, closely overlapping little folds starting from one corner and work your way around, towards the opposite corner.  Fold the last fold over itself, staple the last fold to itself, and then staple a few of the folds along the parchment paper.
  6. Place the package on a baking tray and bake for 20-30
  7. Cut the package open and either slide the contents onto a plate or serve directly from the open parchment (you can cut away the top flap and staples).
Serves 2 Approximately ¾ cup cooked mushrooms per serving

Thai green mango salad with apple

https://www.diabetescarecommunity.ca/diet-and-fitness-articles/recipes/thai-green-mango-salad-with-apple/

This salad will awaken your taste buds with its flavour and textures.  It is a great addition to any Thai meal.  It is healthy, will cool your palate and goes with all Thai dishes.

Ingredients

For the Dressing

Directions

  1. Make the dressing first by mixing all the dressing ingredients together. Set aside.
  2. Using a mandolin or slicer with the julienne blade on, and slice the mango into thin matchsticks (you can also do this by hand using a sharp knife). Slice the apple the same way, place in a tossing bowl.
  3. Add the bean sprouts, coconut, cilantro, green onion, chili and basil leaves, if using. Drizzle the dressing over and gently toss.
  4. Arrange the salad piled on the small platter and sprinkle the peanuts on top and some additional cilantro.

Serves 6, 1 cup servings

Quinoa and black bean salad

https://www.diabetescarecommunity.ca/diet-and-fitness-articles/recipes/quinoa-and-black-bean-salad/

Ingredients

Dressing

Directions

  1. Rinse quinoa in a strainer, put into a small saucepan with the water, and bring to a boil. Reduce the heat and simmer, covered, for 15 minutes. Fluff with a fork and let cool with lid off.
  2. In the meantime, mix the dressing ingredients together in a small bowl or measuring cup.
  3. In a large bowl, toss together the black beans, green onion, celery, tomato, cucumber, cilantro or parsley and most of the cheese, leaving some for sprinkling on the top.
  4. Add the cooked quinoa and dressing, and toss gently.
Serves 8, Each serving is 1 cup

Roasted chickpeas - 6 ways

https://www.diabetescarecommunity.ca/diet-and-fitness-articles/roasted-chickpeas-6-ways/
This is an amazing snack! They will keep for several days in an airtight container.

Ingredients

6 Ways

Salt Sesame Honey Cinnamon Honey Garlic Pepper Fire BBQ

Directions

  1. Preheat the oven to 300˚F.
  2. Drain the chickpeas and rinse well if using canned chickpeas.
  3. Place the chickpeas on a paper towel-lined cookie sheet. Place a second layer of paper towel on top.  Gently rub to dry the chickpeas.  Remove both paper towels and let air dry for 30 minutes.
  4. Drizzle the chickpeas with 2 tsp oil and shake the tray to distribute evenly.
  5. Bake 1 hour.
  6. Remove from oven, but leave the oven on. Drizzle the chickpeas with any of the wet ingredients from your chosen list (oil, honey).  Shake the tray to distribute evenly.
  7. Then sprinkle with all the dry seasoning from your chosen list, and shake the tray to distribute evenly.
  8. Place back in the oven, turn the oven off immediately. Let the chickpeas sit in the oven as it cools for 2 hrs to dry out.
Makes 2 cups of roasted chickpeas.  Each serving is ¼ cup. NOTE: Average nutritional content shown below. Does not vary significantly by flavour.   

Basic breakfast smoothie recipes

https://www.diabetescarecommunity.ca/diet-and-fitness-articles/basic-breakfast-smoothie-recipes/
This basic smoothie recipe is a perfect formula for all different kinds of smoothies, including fruit smoothies, vegetable smoothies, or a combination of the two. Use this recipe ratio as a jumping off point to make all kinds of smoothies.  I also like to make smoothie kits for my freezer.  Put all the contents, except the liquid and/or yoghurt, for one smoothie in individual zip-top bags, so when you want to make a smoothie all you need to do is add the liquid and/or yoghurt.  Using frozen fruit or vegetables will eliminate the need for ice which will lead to an overall better textured smoothie.Base Ingredients (see below for variations) Directions Place all ingredients in a blender and blend until smooth. Serves 1 (about 2.5 cups)

EXAMPLES

Breakfast

Nutritional content using 1% milkNutritional content using nut milk

Strawberry Banana

Nutritional content using 1% milkNutritional content using nut milk

Nutty Chocolate

Nutritional content using 1% milkNutritional content using nut milk

Blueberry Kale

Nutritional content using 1% milkNutritional content using nut milk

Strawberry lime margarita mocktail

https://www.diabetescarecommunity.ca/diet-and-fitness-articles/strawberry-lime-margarita-mocktail/
Warm weather, cool drinks!  This strawberry lime margarita mocktail is sure to please! INGREDIENTS To rim the glasses: For the strawberry mixture: For garnish: DIRECTIONS
  1. Rimmed glasses: Place some salt and the lime zest in a small plate that is slightly bigger than the diameter of the glass rim.  Cut a little notch in the lime wedge and run that notch all around the rim of the glasses.  Dip the edge of each glass in the salt and lime zest.
  2. For the strawberry mixture: In a blender, puree together the strawberries, mint leaves, lime juice, and honey.
  3. Fill each glass with a scoopful of ice and then halfway up with sparkling water.
  4. Pour the strawberry mixture into the glasses until the glasses are full.
  5. Cut a little notch in each of the 4 remaining strawberries and place them on the rims of the glasses, garnish with a few mint leaves.
  6. Serve immediately.
Serves 4

Black pepper ginger cod with rice

https://www.diabetescarecommunity.ca/diet-and-fitness-articles/black-pepper-ginger-cod-with-rice/
This dish comes together in about 20 minutes, except for the rice.  So think ahead a little and get that rice cooking first.  Black rice is super delicious, full of fibre and has a low glycemic index. You can buy it at most grocery stores next to the brown rice.  Sometimes it is called ‘forbidden rice’. It has a warm, nutty taste. If you can’t find it, use regular brown rice instead. Because of the simplicity of flavours in this dish, almost any green vegetable will work well with this meal. Just simply steam a green vegetable such as broccoli, bok choy or asparagus and a full meal is made!

Ingredients

Makes 2 servings

Directions

  1. Start by cooking the rice according to package directions. If you are using a rice cooker, set it to the “brown rice” setting.
  2. Place the cod fillets on a piece of parchment paper. Drizzle with oil and rub the minced ginger all over. Season the fish generously with coarse pepper and the ¼ tsp kosher salt.  Let sit at room temp for 15 minutes (or up to 30 minutes).  Only start cooking the fish once the rice is ready. Have all your ingredients next to the stove.
  3. Heat a small frying pan over medium heat for about 5-8 minutes. Add the oil, place the fish in the pan (I place it with the top side of the fish down).  There is no skin on the fish, but you can tell which side had the skin (face that side up).  Sear the fish for 4 minutes.  Flip, add the whites of the green onion to the pan and cook the fish on the second side for another 4 minutes.
  4. Add the butter in pieces around the fish (not on the fish), add the chili flakes, sugar and vinegar to the pan. Tip the pan towards you and using a spoon, baste the top of the fish with the liquid in the pan.  Do this for about 30 seconds, remove from the heat.
  5. Prepare 2 serving plates with a scoop of black rice. Sprinkle the rice with the green parts of the green onion, a piece of cod on part of the rice and spoon the pan juices all over.
  6. Serve immediately.
Serves 2 (feel free to double this recipe, just use a larger pan).

Apple crisp baked apples

https://www.diabetescarecommunity.ca/diet-and-fitness-articles/apple-crisp-baked-apples/
This clean and healthy dessert is so delicious and one that you can feel great about eating.  So good, that in fact, it would make a perfect breakfast.INGREDIENTS For the Topping: For the Tahini Drizzle (optional): DIRECTIONS
  1. Preheat oven to 375˚F.
  2. Hollow out the apples, but don't use an apple corer—it will slice all the way through the apple, which is not what we're after. You want to remove the core and seeds while keeping the bottom of the apple intact, so you have a nice little vessel in the middle to fill with the crisp. Start by using a paring knife to carefully slice around the top core of the apple, making sure not to go all the way through to the bottom. Then pull out what you cut and use a spoon to scoop out the rest. Make sure that all seeds are out. (I find that the sharp edges of a ½ tsp measuring spoon are ideal for scooping out the core, but any small sharp spoon or even a melon baller will do.)
  3. Place the apples in a roasting dish that holds them snugly.
  4. Mix all the Topping ingredients together (by hand). Spoon the topping evenly into each apple to overflowing.  Pour the water into the bottom of the pan.  Cover pan with foil.
  5. Bake for 25 minutes. Uncover and bake for another 25 minutes or until the apples are soft, shrunken and the crisp is browned.
  6. In the meantime, make the Tahini Drizzle by mixing all the ingredients together with a whisk.
  7. Serve warm with the Tahini Drizzle drizzled over the top.
Serves 8.Nutritional information, with NO sauceNutritional information, with Tahini Drizzle

Zucchini noodles - cacio e pepe

https://www.diabetescarecommunity.ca/diet-and-fitness-articles/recipes/zucchini-noodles-cacio-e-pepe/
This recipe is a takeoff of the traditional Italian Cacio E Pepe or cheese and pepper pasta recipe.  I use spiralized zucchini in place of pasta noodles. To spiralize the zucchini, I use an inexpensive home spiralizer. You can find it online or at any kitchen store. Many grocery stores are now carrying spiralized zucchini in the produce section.  It is a fabulous pasta alternative!  I serve this alongside a simple grilled or roasted chicken breast, lean steak or grilled shrimps.

Ingredients

Directions

  1. In a large sauté pan or wok, heat oil until shimmering.
  2. Add garlic and cook on medium-high heat for 30 seconds. Add cherry tomato halves and cook for 2-3 minutes.
  3. Add the spiralized zucchini, salt and pepper and toss for 1-2 minutes, turn heat off.
  4. Add lemon zest and cheese, and toss.
  5. Serve immediately.
Serves 2

Sheet pan beet salad with caramelized onion, pear and hazelnuts

https://www.diabetescarecommunity.ca/diet-and-fitness-articles/recipes/sheet-pan-beet-salad-with-caramelized-onion-pear-and-hazelnuts/
Cooking all your ingredients in foil pouches in the oven makes this beet salad deliciously easy and incredibly flavourful.

Ingredients

Directions

  1. Preheat oven to 400˚F.
  2. Remove any beet greens but do not peel the beets.
  3. Place the yellow beets in the centre of a large piece of foil. Drizzle with a portion of the oil. Tightly seal the foil around the beets to make a packet. Repeat with red beets. Repeat with the sliced onions. Repeat with the pear slices. Place the packets on a rimmed baking sheet and roast for 1 hour.  The pears and onions will be ready, remove from the oven and let cool in the packets.  Depending on the size of your beets, the beets may need additional time.  Carefully open the packages and pierce the beets with a knife, they should be tender.  If need be, roast for another 15-30 minutes.  Let the beets cool in the packets until you can handle them.
  4. Unwrap the beets, onions and pears and let them cool slightly. Remove the skin of the beets by pinching and peeling it off with your fingers or rubbing it with a paper towel.
  5. Slice the beets into wedges, keeping the red and yellow separate.
  6. Gently combine the sliced beets, pear and caramelized onion on a serving plate, bowl or individual plates (as shown in the photo).
  7. Add the hazelnuts and chives. Drizzle with balsamic vinegar and olive oil.  Distribute the goat’s cheese over the salad and sprinkle with salt and pepper.
  8. Serve warm or room temperature.
Serves 4

Individual cheesecake bites

https://www.diabetescarecommunity.ca/diet-and-fitness-articles/individual-cheesecake-bites/
These bite sized portions are perfect for an occasional indulgence. This lightened-up version of the old favourite has a healthier oat and nut base that gives these little cakes the perfect texture; and. replacing Greek yoghurt for the traditional heavy cream makes these little bites lighter without losing the richness of a classic cheesecake. This recipe makes a large batch. Feel free to freeze what you don’t need. Before starting, make sure your cream cheese, yoghurt and eggs are all at room temperature.

Ingredients

For the Base For the Filling

Directions

  1. Line 18 cups from two 12-cup muffin tins with paper liners. Preheat the oven to 350˚F.
  2. In a blender or food processor mince the oats, pecans, cinnamon, sugar, and salt until you have crumbs. Add the melted butter and process until uniform.  Remove the mixture to a bowl and mix by hand until the mixture is uniform.
  3. Evenly distribute the mixture between 18 cups (about 1 tbsp per cup). Press the mixture firmly into the bottom of the cups.
  4. Bake for 10 minutes, let cool completely.
  5. Make the filling. In a blender, blend together the cream cheese, yoghurt, sugar, eggs, vanilla, lemon zest and juice until completely smooth.
  6. When the cheesecake bases are completely cooled, pour the filling into the cups, using all the filling. It will fill the cups almost to the top.
  7. Bake for 20-25 minutes or until some of the tops are starting to crack and they are no longer wobbly.
  8. Let cool and refrigerate for at least 4 hours or overnight.
  9. Remove from the muffin tin, tear off the liners and serve with berries.
Serves 18 To Freeze:  Remove cakes from muffin tin (leave the liners on) and freeze in an airtight container for 1-2 months.

Easy grain-free banana flax pancakes

https://www.diabetescarecommunity.ca/diet-and-fitness-articles/easy-grain-free-banana-flax-pancakes/
These grain-free pancakes are so delicious and easy to make. The addition of coconut flour which has a lower glycemic index than wheat flour, gives them a great fluffy yet cakey crumb texture. You can find coconut flour in most grocery stores in the natural food aisle (I use Bob’s Red Mill brand). Adding a little ground flaxseed (flax meal) adds a nutty taste and some omega-3 nutrition.INGREDIENTS DIRECTIONS
  1. In a medium-sized bowl, mash the banana with a fork until it is completely mashed and no large lumps remain.
  2. Add the eggs, mash and blend with the fork until uniform.
  3. Add the coconut flour, ground flaxseed, baking powder, cinnamon, salt and vanilla. Mix well.
  4. Add the milk to thin the batter. It will still be quite thick; it will be scoopable, not pourable.
  5. Heat a large nonstick or cast-iron fry pan over medium-low heat. When the pan is hot, add half the oil and turn the heat to low.
  6. Drop 2 tbsp of the batter into the pan and gently coax it into a circular shape, making about 3 pancakes at a time. Let it cook on low for about 4 minutes per side.  Using a thin spatula, carefully flip the pancake and repeat on the second side. Add the remaining oil and batter and make another 3.
  7. Serve with berries or banana slices.
Makes six 3-inch pancakes; serves 2. To keep warm: Heat the oven to 350˚F and line a baking sheet with parchment paper.  As the pancakes come out of the fry pan, place them on the baking sheet and into the oven to keep warm.

Traditional fried rice - the healthy way

https://www.diabetescarecommunity.ca/diet-and-fitness-articles/diabetes-diet-articles/traditional-fried-rice-the-healthy-way/
Fried rice is a great weeknight accompaniment to any meal—easy and delicious!  This recipe is a “healthy” version of the traditional recipe since it includes lots of veggies, is low in sodium, and uses brown rice. Fried rice is best made with COLD leftover rice, so make your rice the day before so that you can chill it.  Alternatively, you can make extra rice the next time you cook rice and freeze the 4 cups you need for this recipe.  You can use all kinds of vegetables, but I have kept it pretty simple.  Just make sure all your veggies are chopped and ready because once you get cooking, it all needs to be added in sequence and pretty quickly. Serve with chicken or tofu and you have a complete meal!INGREDIENTS DIRECTIONS
  1. Remove the florets from the broccoli and break or cut them into small pieces. Set aside.
  2. Cut the end off the broccoli stem, discard. Using a vegetable peeler, peel the broccoli stems and discard the shavings. Dice the broccoli stems into small pieces.
  3. In a large fry pan or wok, heat only 1 tbsp of the oil over medium-high heat.
  4. Add the onion and diced broccoli stem and sauté until the onion is translucent, about 5 minutes. Add the whites of the green onion, garlic and ginger and sauté for 1-2 minutes. Add the frozen mixed vegetables and broccoli florets and sauté until the frozen veggies are defrosted and the broccoli is bright green, about 3-4 minutes.
  5. Turn the heat to high, move all the veggies to the sides of the pan, making a well in the centre. Add another 1 tbsp of oil to the pan. Add the cold rice, press the rice into the oil and hot pan to give it a crust and toss the rice while pressing. Do this for 1-2 minutes.
  6. Move the fried rice and all the veggies to the sides of the pan, making a well in the centre. Add the beaten eggs and stir constantly so they set and form eggy threads that will distribute evenly throughout the dish. Once the egg is cooked, toss through the rice.
  7. Add the soy sauce or tamari, toss through. Sprinkle the green parts of the green onion on top before serving.
Serves 6 (1 cup portions)

Roasted whole carrots with tahini drizzle

https://www.diabetescarecommunity.ca/diet-and-fitness-articles/diabetes-diet-articles/roasted-whole-carrots-with-tahini-drizzle/
Tahini drizzled on roasted carrots is so delicious. Tahini is sesame seed paste and you will find it near the peanut butter in most grocery stores.INGREDIENTS DIRECTIONS
  1. Arrange the oven rack to the middle position and preheat the oven to 400˚F convection or 425˚F regular bake.
  2. Line a cookie sheet with parchment paper.
  3. Place the carrots on the lined cookie sheet. Drizzle with oil and sprinkle with salt, tossing and rearranging so that the carrots are uniformly lined up.  Cook for 45 minutes.
  4. In the meantime, make the Tahini Drizzle. Whisk all the ingredients in a small bowl until smooth.  Set aside.
  5. When the carrots are ready, add the Tahini Drizzle.
Serves 4.

Sheet pan BBQ chicken with "fries"

https://www.diabetescarecommunity.ca/diet-and-fitness-articles/sheet-pan-bbq-chicken-with-fries/
This Dry Rub and BBQ Sauce or ‘The Mop’ can be used in place of any rub or sauce.  It is a healthier version of those you may find in a grocery store which are usually laden with sugar and salt.INGREDIENTS 1 whole chicken, cut into 8 pieces The Dry Rub The Mop (sauce) DIRECTIONS
  1. Make the Dry Rub: Mix all the rub ingredients in a small bowl, set aside.
  2. Preheat the oven to 375˚F. Line a cookie sheet with foil.
  3. Bring the chicken to room temperature for 30 min-1 hour (depending on the temp in your kitchen) before cooking.
  4. Place the chicken on the sheet (towards one end, leaving room for the parsnips). Sprinkle the chicken all over with The Dry Rub.
  5. Place the parsnips on the other end of the sheet, drizzle with oil and sprinkle with salt, toss and arrange so that they are relatively flat.
  6. Place in the oven for 35 minutes.
  7. In the meantime, make The Mop: Mix all The Mop ingredients together in medium sized bowl.  Remove half of The Mop for another use (store in the fridge for 2 weeks or freeze for 3 months), you will only need half this time.  Set aside.
  8. After 35 minutes, remove the tray from the oven, brush the chicken with the reserved ½ of The Mop.
  9. Place the sheet back in the oven for another 20 minutes or so.
  10. Serve immediately.
Serves 6.

Fresh tofu tangled between crispy brussel sprouts and sesame soba

https://www.diabetescarecommunity.ca/diet-and-fitness-articles/diabetes-diet-articles/fresh-tofu-tangled-between-crispy-brussels-spouts-and-sesame-soba/
There are so many deliciously complex flavours and textures here.  Your tastebuds will be singing songs of happiness.  All parts of this bowl can be made separately and used for different meals in other combinations.  I make these crispy Brussels sprouts as a regular side dish.  By the time all the kitchen lurkers pass by, only half of them ever make it to the dinner table! INGREDIENTS 8 ounces of soba noodles Nutty Sesame Sauce For the Tofu For the Brussels sprouts DIRECTIONS
  1. Shred the Brussels sprouts using the slicer on the food processor or slice them thinly with a knife. You can also buy shredded Brussels sprouts. Place them on a parchment-lined cookie sheet. Spray with oil and toss. Bake for 30 minutes or until golden and crispy.
  2. In the meantime, cut the tofu into 1-inch cubes. In a shallow dish, mix the apple cider vinegar, tamari, water, oil, and sesame seeds. Place the tofu cubes into the shallow bowl with the marinade. Allow to marinate while you cook the soba noodles.
  3. Cook the soba noodles according to package directions and rinse in cold water once cooked.
  4. Make the Nutty Sesame Sauce. Whisk all of the ingredients together in a small bowl. Pour over the noodles and toss to combine.
  5. Divide soba between 4 bowls.
  6. Divide the tofu between the four bowls. Divide the crispy Brussels sprouts between the four bowls.
  7. Sprinkle each bowl with cilantro and sliced chili peppers.
Serves 4

Creamless asparagus soup with whole grain croutons

https://www.diabetescarecommunity.ca/diet-and-fitness-articles/creamless-asparagus-soup-with-whole-grain-croutons/
This soup is so easy and beautiful to serve hot or chilled.  Make this in the spring when asparagus are in season.INGREDIENTS For the croutons: DIRECTIONS
  1. In a medium-sized soup pot, heat oil, add the shallots, and cook until translucent, about 3-5 minutes.
  2. In the meantime, trim the hard woody ends off the asparagus by snapping them where they most easily break, and discard the ends. Chop the asparagus in 1-inch pieces.  Set aside.
  3. When shallots have softened, add almond milk, water, salt and pepper, and bring to a boil.
  4. Add asparagus, cook 5 minutes, and turn heat off.
  5. While soup is cooking, place the sliced almonds in a blender or food processor, and chop until almonds are mostly finely chopped (leave some a little chunkier for a nice texture in the soup). Transfer to a heat-proof bowl or second pot - where the pureed soup will eventually go into.
  6. When the soup has cooled enough to puree, then, working in batches, puree the soup until smooth, and transfer to the pot/bowl with almonds.
  7. Mix the almonds throughout the soup. Serve hot or cold, with chives and croutons.
  8. FOR THE CROUTONS (I do this while the soup is cooking or afterwards): Heat a fry pan over medium heat.  Add the bread cubes to a fry pan and spray them all over with oil spray.  Cook, tossing occasionally, until the bread is toasted and dried out.  Remove from heat and let cool.  You can store the croutons in an airtight container for up to 3 days or in the freezer for 6 months.
Serves 6 This soup freezes well or you can make it the day before and store it in the fridge.

Salmon burger with tzatziki

https://www.diabetescarecommunity.ca/diet-and-fitness-articles/diabetes-diet-articles/salmon-burger-with-tzatziki/
The salmon burgers are a delicious burger option for the summer.  You can grill them or cook them in a frying pan.INGREDIENTS For the Tzatziki Cooking spray Burger buns, optional Sliced Tomato TzatzikiDIRECTIONS
  1. Using a knife, chop the salmon finely. Mix the chopped salmon with grated ginger, minced parsley, cilantro or spinach, chili powder, cayenne powder, panko or breadcrumbs, minced green onion, salt and pepper.  Form into 4 patties.
  2. Make the Tzatziki: Mix the yoghurt with the garlic, diced cucumber and set aside.
  3. Heat the grill to medium heat or heat a 12-inch cast iron skillet over med-high heat on the stove top.
  4. When the grill is hot, spray the grill with cooking spray. (If you are cooking them in a pan, coat the bottom of the skillet with cooking spray.)
  5. Grill or sear the burgers for 4 minutes per side. If they are sticking to the grill, wait another minute before flipping.
  6. Serve with or without a bun with the tzatziki and sliced tomato
Makes 4 burgers

Too-easy grilled corn salad with herbs and stone fruit

https://www.diabetescarecommunity.ca/diet-and-fitness-articles/recipes/too-easy-grilled-corn-salad-with-herbs-and-stone-fruit/
This super yummy corn salad is the perfect addition to any summer BBQ dinner. You can make it ahead or serve it right off the grill.INGREDIENTS For the Dressing   DIRECTIONS
  1. Prepare grill for medium-high heat.
  2. Brush corn with oil, sprinkle with kosher salt and chili powder. Place the corn on the grill, cook, turning often, until it is tender and charred in spots, 6-8 minutes total.  Transfer to a cutting board and let cool, then cut kernels from cobs.
  3. Make the Dressing: In a medium bowl, mix all the ingredients together using a whisk. Set aside.
  4. In a large mixing bowl, toss together the corn kernels and nectarine slices/pieces. Drizzle with half of the dressing and gently toss.  Fold the herbs and cheese through the salad.
  5. Place the salad on a platter and drizzle with the remaining dressing.
Serves 6.

Fish fillets with sautéed peppers and balsamic reduction

https://www.diabetescarecommunity.ca/diet-and-fitness-articles/diabetes-diet-articles/fish-fillets-with-sauteed-peppers-and-balsamic-reduction/
This is a delicious and simple weeknight meal.  It presents so beautifully. It is perfect for entertaining as well.  I prefer to use fish with skin on it, as it tends to fall apart less.INGREDIENTS For the Fish Balsamic reduction INSTRUCTIONS
  1. Make the balsamic reduction by heating the olive oil (for the reduction) in a small pot or pan. Add the balsamic vinegar and honey, and simmer until it thickens and reduces, about 5 minutes. Reserve.  This step can be done well in advance (hours or a day or two; store at room temp or refrigerated) and the reduction reheated before serving.
  2. Heat a non-stick fry pan to medium-high heat. Add 1 tbsp extra virgin olive oil.  Add the vegetables to the pan, toss to coat, and sprinkle with a little salt and pepper.  Cook for about 10 minutes or until the veggies are fork tender and browned on the edges.  Remove to a plate, cover with foil to keep warm.
  3. Add the remainder of olive oil to the pan. With a sharp knife, score the skin of each filet twice.   If you are using fish that has no skin such as tilapia or cod, you do not need to score the fish.  Salt and pepper the fish fillets on both sides.
  4. Lay the fish skin-side down in the hot pan (if there is skin on the fish). The fish may curl; you can give it a little “press down” with a spatula for a minute.  Cook for 2-3 minutes, flip and cook the other side for 2-3 minutes.
  5. Divide the vegetables between the plates and lay the fish on top of the vegetables. Drizzle the fish, and around the fish, with the balsamic reduction.
  6. Sprinkle parsley on top.
Serves 4

Easy homemade applesauce

https://www.diabetescarecommunity.ca/diet-and-fitness-articles/easy-homemade-applesauce/
The success of making applesauce lies in two factors: the apple itself and the pureeing tool you use. Choose a soft-fleshed and very sweet apple. McIntosh apples are generally the best for applesauce. However, sometimes they can be bland and impart a brownish (as opposed to pink) colour. Taste the apple before investing in 5 pounds and an hour or so of work. If you can’t find good McIntosh apples, use Northern Spy or Empire. Now for the technique. I’ve seen countless applesauce recipes and Instagram posts that require you to peel and core the apples. But, if you peel the apple, you lose the beautiful pink colour that the skin can provide. Also, removing the core is a pain and can possibly waste a lot of good fruit. The best way to make applesauce is with a food mill. It may be an investment in another gadget, but trust me, you will save loads of time (and isn’t your time valuable?). When you use a food mill, you don’t need to peel or core the apples. You just remove the sticker (lol), wash the apples, cut them in quarters and throw them in the pot. Done! However, do not fret, if you don’t have a food mill. I would core the apple but leave the skin on. Once they are cooked, push the flesh through a strainer. If you want it smoother afterwards, you can blend it or puree it in a food processor. The moral of the story is...do not peel those apples before cooking them. You can also make “ugly” applesauce and puree the cooked apples in a food processor or blender with the skins on (I would do that if I did not have a food mill). A perfect in-season apple needs nothing added to make a delicious applesauce, unless you like a little cinnamon. You can add a tiny bit of sugar and salt to the overall applesauce to bring up the flavour if you are using less-than-perfect apples.INGREDIENTS Makes 6 cups / 12 ½-cup servingsINSTRUCTIONS
  1. In a large heavy-bottom pot, add the apples, water and lemon juice. Cover and turn heat to medium-high. Bring to a simmer and cook until the apples start to release some liquid, about 10 minutes.  Remove the lid and stir.
  2. Reduce the heat to medium-low and cook covered for about 45 minutes, stirring occasionally. While stirring, you can mash some of the apples with a fork or potato masher.  The apples should be very soft.
  3. Let cool for about 30 minutes.
  4. USING A FOOD MILL: Transfer the apples, in batches, to the food mill fitted with the medium disk placed over a bowl, and process the apples through the food mill. Every once in a while, reverse the dial on the food mill to scrape the skin off the bottom, process again and then discard the solids as you go.
  5. USING A BLENDER OR FOOD PROCESSOR: First, push the flesh through a strainer. If you want a smoother texture, you can blend or puree the mixture.
  6. If the sauce is watery, return it to the pot and simmer over medium heat until thickened.
  7. Taste the applesauce for flavour. Add cinnamon, salt and sugar if desired (I generally never add sugar).

Sheet pan Greek fish with feta, tomatoes, potatoes and broccolini

https://www.diabetescarecommunity.ca/diet-and-fitness-articles/diabetes-diet-articles/sheet-pan-greek-fish-with-feta-tomatoes-potatoes-and-broccolini/
Sheet pan dinners are the way to go during the week—easy, simple cleanup and crowd pleasers! This recipe is also great with butterflied chicken breasts. If you are serving more than four people, add a second sheet and double the recipe (and use the convection setting).INGREDIENTS INSTRUCTIONS
  1. Preheat the oven to 425˚F regular or 400˚F convection (see headnote).
  2. On a rimmed baking sheet, toss the potatoes with 1 tablespoon of the olive oil and 1 teaspoon of oregano. Scatter the smashed garlic and lemon wedges around the potatoes and roast for 25 minutes.
  3. In the meantime, mix together the remaining olive oil (3 tablespoons), finely chopped garlic, kosher salt and pepper. On your work surface (I line it with parchment paper), season the fish with half of this mixture.  Then use the remaining mixture to toss with the broccolini and tomatoes.
  4. After the 25 minutes, remove the potatoes from the oven and nestle the fish in and around them. Scatter and nestle the broccolini and tomatoes around the fish and potatoes.  Then place the feta in the empty spots.
  5. Return the pan to the oven and bake for 12-20 minutes or until the fish is cooked; it should flake when pierced with a fork.
Serves 4.

3-ingredient chocolate bark with pumpkin seeds and cherries

https://www.diabetescarecommunity.ca/diet-and-fitness-articles/recipes/3-ingredient-chocolate-bark-with-pumpkin-seeds-and-cherries/
This is the perfect holiday treat! Make a bag and give it as a host gift, serve it at the end of a holiday dinner or simply when you are in the mood for chocolate! They are pre-portioned so you know exactly what you are getting.Ingredients Equipment Instructions
  1. Line 17 muffin cups with liners.
  2. Make a double boiler: Fill a medium-size pot halfway with water, place over medium heat.  Place chocolate chips in a medium-size heat-proof bowl, one that is slightly LARGER than the circumference of the pot (I use a Pyrex bowl over the pot with water).  The chocolate will begin to melt; as it melts, stir it a little so that all the pieces get equal treatment.  Make sure that the water is on a slow boil—you don’t want to get ANY steam or water in the chocolate because it will cause the chocolate to separate.
  3. When the chocolate is melted and still warm, put 1 tablespoon of chocolate into each of the 17 cups; you will have exactly enough.
  4. Distribute the pumpkin seeds evenly over each cup. Distribute the dried cherries or cranberries over each cup, about 3 cherries or cranberries per cup.
  5. Put muffin tins in the refrigerator to harden. When the chocolate is mostly firm, sprinkle with the flaked salt.
Serves 17. Store in the refrigerator.

Roasted broccoli “steaks” with white beans and tangy vinaigrette

https://www.diabetescarecommunity.ca/diet-and-fitness-articles/diabetes-diet-articles/roasted-broccoli-steaks-with-white-beans-and-tangy-vinaigrette/
This broccoli dish is perfect as a side dish or as a vegetarian main course. The addition of white beans adds both protein and fibre.INGREDIENTS For the Broccoli For the White Beans For the Dressing INSTRUCTIONS
  1. Preheat the oven to 400°F.
  2. Using a vegetable peeler, remove the outer tough layer of the broccoli stems. Cut the smaller broccoli “trees” lengthwise through the stems so that you have a nice flat side of the broccoli piece.  For the bigger “trees,” cut lengthwise into 2-3 pieces.  Make sure each piece has a nice flat surface.
  3. Line a cookie sheet with parchment paper or foil and generously spray the surface. Lay the flat side of the broccoli pieces on the oiled cookie sheet surface.  Brush the broccoli with oil or generously spray.  Sprinkle with salt.  Roast for 15 minutes.
  4. In a bowl, toss the white beans with oil.
  5. Remove the cookie sheet from the oven and place the white beans all around the broccoli. Place the sheet back in the oven and continue roasting until the broccoli has browned and the white beans have crisped a little, about 20-25 minutes.
  6. In the meantime, make the dressing: Mix all the ingredients together with a spoon or fork by hand.  The dressing will be chunky, almost like a salsa.
  7. When the broccoli and white beans are cooked, remove from the oven, place on a platter or in a shallow bowl. Drizzle with the dressing and serve hot or warm.
Serves 4.

Popcorn chicken bites with chipotle honey mustard

https://www.diabetescarecommunity.ca/diet-and-fitness-articles/diabetes-diet-articles/popcorn-chicken-bites-with-chipotle-honey-mustard/
The perfect finger food! These little bites are baked, not fried, making them a little lower in fat. Serve them with this irresistible Chipotle Honey Mustard.INGREDIENTS Nonstick oil spray (Pam or avocado oil) For the Chicken For the Popcorn Coating For the Chipotle Honey Mustard INSTRUCTIONS
  1. Preheat oven to 400˚F. Line a cookie sheet with foil and place a cooking rack on top of the foil-lined sheet.  Generously spray the cooking rack with nonstick spray.  If you don’t have a cooking rack, generously spray the foil with nonstick oil spray.
  2. Make the popcorn coating: In a blender or food processor, combine all the ingredients and process until you have coarse crumbs.  Place them in a zip-top bag or shallow dish.
  3. For the chicken: Place starch in a shallow dish and place eggs in another shallow dish. Arrange dishes in a row so that the starch is first, then the eggs, then the Popcorn Coating.
  4. Working with several pieces of chicken at a time, toss the chicken in starch, shake off excess. Dunk the chicken in egg, then coat it in the Popcorn Coating   Lay coated chicken pieces on the baking rack or directly on the foil-lined sheet.  Repeat with all the chicken.  Generously spray the tops of the chicken bites with additional oil spray.
  5. Bake in the oven for 20-25 minutes or until golden brown.
  6. In the meantime, make the Chipotle Honey Mustard: Mix the mustard with the honey, oil, lemon and chipotle powder or hot sauce.
Serves 4. Make-Ahead Tip: The chicken can be dipped in starch, egged and coated, placed on a sheet of wax/parchment paper and either stored for the day in the refrigerator or frozen. Once frozen, the chicken pieces can be stored in a zip-top bag.  Allow the chicken to defrost uncovered in the refrigerator for a few hours or overnight before baking.

Cheaters guacamole

https://www.diabetescarecommunity.ca/diet-and-fitness-articles/diabetes-diet-articles/cheaters-guacamole/
This is a very simple version of guacamole.  A true guacamole will have cilantro, jalapeno, tomato and onion in it.  Feel free to add what you like!INGREDIENTS INSTRUCTIONS
  1. Slice the avocado in half, remove the pit and using a spoon, scoop the flesh onto a plate or a bowl.
  2. Mash the flesh with a fork, add the lime juice and salt, mix well.
Serves 4 Chef Tip: 

All-purpose red wine vinaigrette

https://www.diabetescarecommunity.ca/diet-and-fitness-articles/diabetes-diet-articles/all-purpose-red-wine-vinaigrette/
This dressing goes well with any leaf or grain salad.  Make this and keep it in your fridge for up to 10 days.INGREDIENTS INSTRUCTIONS
  1. In a mixing bowl or dressing container, whisk all ingredients together.
  2. Drizzle on salad, toss, serve.
Makes 355 ml dressing.  24 1-tablespoon servings.

Cacio e pepe roasted spring asparagus

https://www.diabetescarecommunity.ca/diet-and-fitness-articles/diabetes-diet-articles/cacio-e-pepe-roasted-spring-asparagus/
There are a few non-negotiables (smile) that make this dish perfect: the peeling off the woody bottoms of the asparagus spears, the blanching in salted water and the quick roast at the end. If you just roast the asparagus in the oven, the asparagus with be tough.INGREDIENTS INSTRUCTIONS
  1. Preheat oven to 450˚F.
  2. Bring a skillet filled with water to boil. While the water is boiling, snap off about 1 inch from the bottom of each asparagus spear and then, using a vegetable peeler, peel about 2 inches from the bottom.  Boil the asparagus for 3-4 minutes, drain and dry.
  3. Place the asparagus in an oven-safe serving dish, drizzle with the olive oil and sprinkle with the cheese and pepper.
  4. Bake for 5 minutes. Remove from the oven and serve with a squeeze of lemon.
Serves 4.

Spring quinoa with asparagus and kale

https://www.diabetescarecommunity.ca/diet-and-fitness-articles/diabetes-diet-articles/spring-quinoa-with-asparagus-and-kale/
This springtime quinoa salad is perfect as a side dish to any meal or a light lunch. Make sure that the asparagus and kale are sliced in time for the last two minutes of the quinoa cooking.INGREDIENTS INSTRUCTIONS
  1. Put the quinoa in a medium sauce pan or pot with water and kosher salt, cover and bring to a boil over high heat. Watch the quinoa carefully, do not let it cook on high heat once it boils.  Once boiling, reduce the heat and simmer and cook for 13 minutes.
  2. In the meantime, slice the asparagus thinly (about ¼ inch) on an angle, set aside. Stack the kale leaves on top on one another and roll them up like a carpet.  Slice them thinly so you have thin ribbons.
  3. When the quinoa timer is up, quickly add the kale and then the asparagus to the pot—DO NOT STIR— put the lid back on and continue to cook for another 2 minutes. Remove from the heat.  Let it steam for another minute or so before taking the lid off.  Open the lid and, with a fork, very gently toss the quinoa from the bottom, 3-4 times.  Let cool uncovered while you prepare the dressing.
  4. In a large mixing bowl, mix together the lemon juice, herbs, garlic, capers, mustard, oil and pepper.
  5. Add the quinoa to the bowl, gently toss. Serve warm or at room temperature.
Serves 6.

Lemony Greek chicken kebabs

https://www.diabetescarecommunity.ca/diet-and-fitness-articles/lemony-greek-chicken-kebabs/
These lemony Greek chicken kebabs are super easy to make and delicious served hot, warm or even room temp.  They pair well with almost any meal.  Serve them with a simple salad of tomatoes, lettuce, cucumber or with rice.INGREDIENTS INSTRUCTIONS
  1. Combine the ingredients (first 8 ingredients) for the chicken marinade in a medium-sized bowl, add chicken. Let marinate for several hours or overnight.
  2. When ready to grill the chicken, heat grill to high. Put 4-5 chicken pieces on each skewer with 2 pieces of red onion in between each piece of chicken.
  3. Grill the chicken on medium/high. Turn after 4-5 minutes or when the chicken releases easily from the grill and golden grill marks have formed.  Grill on 3-4 sides (total about 10-15 minutes).
  4. Serve hot or room temperature.
Serves 6

Banana chocolate chip ice cream

https://www.diabetescarecommunity.ca/diet-and-fitness-articles/recipes/banana-chocolate-chip-ice-cream/
If you are craving something sweet but want to stay off the rich stuff, this is your recipe. It is simple, delicious and it will definitely hit the spot! I make a big batch and leave it covered in the freezer.  It scoops well and is delicious!INGREDIENTS INSTRUCTIONS
  1. Place the almond beverage in the blender first, and then add everything else except the chocolate and blend until smooth. Remember, there is not a lot of liquid in this, so you will need to give the blender a little assistance.
  2. Scoop mixture out of the blender and into a parchment lined container. Stir in the chocolate chips and freeze for 20-30 minutes before serving.
  3. Scoop and enjoy!
Serves 2. *When my bananas are on their last legs (lots of spots but not black), I cut them into pieces (about 6 pieces per banana), place them on a parchment lined tray and throw them in the freezer.  When the pieces are frozen, I place them in bags, 3 pieces per bag, totaling a half-banana serving per bag.  Then I can use them in smoothies or for this treat.  Freezing them in half-banana servings makes it very usable!

Cheaters Coleslaw

https://www.diabetescarecommunity.ca/diet-and-fitness-articles/recipes/cheaters-coleslaw/
This is my go-to slaw recipe that satisfies every time.  Serve it with almost any grilled protein or as an easy side salad. It can be made one day in advance and will last 3-4 days.INGREDIENTS INSTRUCTIONS
  1. In a large bowl, mix together the vinegar, oil, honey, and salt.
  2. Add the coleslaw mix and green onion. With your hands, aggressively mix (you almost want to massage) the slaw mix with the dressing.
  3. Enjoy!
Serves 6

Cauliflower fritters with tomato, cucumber and chickpea chop

https://www.diabetescarecommunity.ca/diet-and-fitness-articles/diabetes-diet-articles/cauliflower-fritters-with-tomato-cucumber-and-chickpea-chop/
This is the perfect workday lunch.  Make this ahead of time and eat it for several days. I love cooking once and reaping the benefits all week.  Lately, life has been so busy that having a grab-n-go lunch is the best way to keep me on track and fuel my body properly for what’s to come. I love anything cauliflower, but add a little sweetness from almond flour and crunch from a hot fry-pan, mmmm… delicious! I made a simple side salad that keeps for a few days in the fridge. Putting it all together makes for a high protein and vegetable complete lunch or light dinner.INGREDIENTS For the Cauliflower Fritters: For the Chickpea Chopped Salad: DIRECTIONS
  1. To Make the Cauliflower Fritters: Steam the cauliflower rice on the stovetop for 8 minutes or in the microwave for 5 minutes.  Let cool. Place on a kitchen towel and ring the cauliflower out as much as possible (the drier the better). Let cool.
  2. In a large mixing bowl, mix the cauliflower with the eggs, almond flour, parsley, salt, and pepper.
  3. Heat a large fry pan over medium heat and add the oil.
  4. Using your hands, scoop a handful of cauliflower batter (you will have enough for 8 patties) and gently place it into the hot pan and then press to form a thick patty. Repeat until you have filled the pan with about 5 patties. Cook for 1 minute, cover the pan (so the egg cooks) for 4-5 minutes, then uncover and let cook until the edges have browned, flip and repeat on the other side. Remove the fritters from the pan and place on a paper-towel-lined plate. Repeat with the remaining batter.
  5. To Make the Chickpea Chopped Salad: Mix all the salad ingredients together.
  6. Pack the fritters and the salad into lunch size containers.
Serves 4 for lunch *Place the cauliflower florets (in batches) in the food processor and pulse until a rice-like consistence appears. Store bought is a very good option here.

Riced cauliflower with quinoa and pomegranate

https://www.diabetescarecommunity.ca/diet-and-fitness-articles/riced-cauliflower-with-quinoa-and-pomegranate/
This is the perfect entertaining side dish.  It looks beautiful and you can make it ahead of time.INGREDIENTS DIRECTIONS
  1. *To make riced cauliflower: Cut cauliflower into florets and place in a food processor, pulse until a rice-like texture appears. NOTE: You can also find riced cauliflower in many grocery stores.
  2. **To cook quinoa: Rinse 1 CUP RAW/UNCOOKED quinoa in a strainer, put into a small saucepan with 1½ cups water and ½ tsp salt, and bring to a boil. Reduce the heat and simmer covered for 15 minutes. Remove from heat, fluff with a fork and let cool with lid off.  *YOU WILL ONLY NEED 1 CUP OF THIS QUINOA. You can save the rest for lunches. Set aside.
  3. Heat a large frying pan or wok with the 2 tsp of olive oil, and add the riced cauliflower, toss and cook until softened but still has a crunch to it, about 6 minutes. Turn heat off. Add the cooked quinoa to the pan with the cauliflower, toss.
  4. In a large mixing bowl, mix together the pomegranate seeds, parsley, garlic, green onion, lemon juice, olive oil, salt and pepper.
  5. Gently toss the cauliflower-quinoa mixture into the bowl with the pomegranate seed mixture, fold to mix.
  6. Add the chopped roasted almond.
Serves 8

Omelette bites

https://www.diabetescarecommunity.ca/diet-and-fitness-articles/omelette-bites/
You can bake these in a regular muffin pan in the oven or you can place the muffin pan in a water bath to make a ‘faux sous vide’. This makes the omelette super smooth and creamy.  The lower and slower you cook them, the better.  Using a silicone muffin tray works best.INGREDIENTS INSTRUCTIONS Preheat oven to 300˚F. Using a water bath:
  1. Pour water ⅓ of the way up a 9x13 pyrex dish or larger roasting pan (it will need to hold the muffin tray). Set aside.  Grease a 12-cup muffin tin.  Using a silicone muffin tray works best if you have one.
  2. Beat the eggs, salt and pepper in a pourable bowl.
  3. Divide cheese, spinach and red peppers between the 12 muffin cups, then evenly fill with the beaten eggs.
  4. Cover the muffin tray with a sheet of parchment paper, then tightly cover with foil. Place the water filled roasting pan in the oven, and then place the muffin tray in the water filled roasting pan. Leave uncovered.
  5. Bake for 75-80 minutes.
  6. Remove the water bath with the muffin tray in the water bath from the oven and let them rest in the water bath until the water is cool. Remove the tray, the parchment and the foil, and then remove the omelettes from the muffin cups.
Regular baking method:
  1. Grease a 12-cup muffin tin.
  2. Beat the eggs, salt and pepper in a pourable bowl.
  3. Divide cheese, spinach and red peppers between the 12 muffin cups, then evenly fill with the beaten eggs.
  4. Bake uncovered for 75-80 minutes.
Remove from oven and let cool before removing omelettes from the muffin cups. Makes 12 The omelettes freeze well.

No-bake salted tahini fudge bars

https://www.diabetescarecommunity.ca/diet-and-fitness-articles/no-bake-salted-tahini-fudge-bars/
These bars are super easy to make and don’t require any cooking.  Keep them in the fridge or freezer to offer to last minute guests. Also great for a protein-packed snack to grab for your winter walks and hikes.INGREDIENTS For the Top INSTRUCTIONS
  1. Line a loaf pan with parchment paper. Leave a little overhang on the two long sides.
  2. In a food processor pulse together the dates with the flax and almonds until fine crumbs, and transfer to a large mixing bowl.
  3. Stir in the oats, chocolate pieces, tahini, salt, honey and olive oil. Press into the prepared pan. Refrigerate for several hours.
  4. Drizzle the chocolate over top and scatter the chopped nuts. Refrigerate until the chocolate has solidified a little (10 minutes or so) and then sprinkle with flaked sea salt.
  5. Remove from the loaf pan and cut into bars. Store bars in the fridge or freezer, they are soft at room temp.
Makes 10 bars

Spinach, quinoa and oat patties

https://www.diabetescarecommunity.ca/diet-and-fitness-articles/spinach-quinoa-and-oat-patties/
Make a batch of these and you won’t have to think about lunch all week! These are a great way to get a protein-packed lunch while also getting a dose of dark green vegetables. Every time you eat dark greens you are feeding your body wonderful nutrients.INGREDIENTS INSTRUCTIONS
  1. Prepare quinoa according to package directions.
  2. Mix together the cooked quinoa with the oats, eggs, cheese, chopped spinach, salt and pepper. Refrigerate for about 30 minutes.
  3. Heat a frying pan over medium heat (I like cast iron for this), add olive oil.
  4. Using your hands, scoop a small handful of mixture and form into a patty (repeat). Lay each one in the hot oil and press the tops to flatten them a little. Cook for about 5-6 minutes per side.  Give them time to brown and cook so that they will hold together.  Using a spatula, carefully flip and cook on the second side.
  5. Remove from the pan and enjoy right away. Can be refrigerated or frozen for later use.
Makes 12 patties

5-ingredient honeyed ricotta walnut brittle strawberry bites

https://www.diabetescarecommunity.ca/diet-and-fitness-articles/recipes/5-ingredient-honeyed-ricotta-walnut-brittle-strawberry-bites/
These little strawberry bites are the perfect last-minute dessert. They are easy to make, healthy and ideal for a pass-around dessert party! In case you’re wondering, I did not count the oil and salt in the 5-ingredient title :)INGREDIENTS Optional: Add a couple tablespoons of milk or yoghurt to thin ricotta if necessary (not reflected in nutritional analysis)INSTRUCTIONS
  1. Heat a small fry pan over medium low heat. Add the oil and the walnuts, toast for 4 minutes, then add the salt and half the honey.  Cook for another 3-4 minutes, tossing a few times.  Remove from the heat, transfer to a parchment paper and let cool.  This will cool and become a Walnut Brittle. When cool, roughly chop.
  2. Carefully remove the tops of the strawberries, making a flat, slightly indented top—a place for the ricotta to sit on. Slice a thin slice off the bottom of each strawberry, so that the strawberry will be able to sit flat on a plate or platter.
  3. If the ricotta is very stiff, add a couple of tablespoons of milk or yoghurt. Dollop 1 tablespoon of ricotta on top of each strawberry. Repeat with all the berries. Drizzle all the ricotta-topped berries with the remaining honey, and sprinkle with orange zest and Walnut Brittle.
Serves 6.

Sheet pan roasted veggies with chickpeas

https://www.diabetescarecommunity.ca/diet-and-fitness-articles/sheet-pan-roasted-veggies-with-chickpeas/
This one-pan recipe is super easy to prepare and a real crowd pleaser. The addition of chickpeas makes it a great vegetarian main course or a higher protein side dish. It makes a big batch, perfect for a crowd or great for leftovers.INGREDIENTS INSTRUCTIONS
  1. Preheat oven to 375˚F.
  2. In a large roasting pan toss together all the cut-up veggies.
  3. Drizzle the olive oil over the veggies, sprinkle with salt and pepper, and toss to coat.
  4. Cook for 1 hour.
  5. Remove from oven, raise the heat to 450˚F OR if you have, use convection roast 425˚F.
  6. ADD CHICKPEAS and cook for another 20 minutes to half hour or until the veggies are speckled with brown marks.
Serves 6

Diabetes-friendly banana bread recipe

https://www.diabetescarecommunity.ca/diet-and-fitness-articles/diabetes-diet-articles/diabetes-friendly-banana-bread-recipe/
This recipe includes unsweetened applesauce as a substitute for some of the oil, which reduces the overall fat content. The addition of walnuts provides a healthy dose of omega-3 fatty acids and adds a delicious crunch to the bread. And believe it or not - there is no added sugar!INGREDIENTS INSTRUCTIONS
  1. Preheat your oven to 350°F (175°C). Grease a 9x5 inch loaf pan with cooking spray.
  2. In a large mixing bowl, whisk together the mashed bananas, eggs, vegetable oil, applesauce, and vanilla extract.
  3. In a separate bowl, whisk together the whole wheat flour, baking soda, cinnamon, and salt.
  4. Add the dry ingredients to the wet ingredients and stir until just combined. Fold in the chopped walnuts, if using.
  5. Pour the batter into the prepared loaf pan and bake for 50-60 minutes or until a toothpick inserted into the center comes out clean.
  6. Let the banana bread cool in the pan for 10 minutes before removing it to a wire rack to cool completely.
Makes 12 slicesNutritional analysis includes the addition of walnuts

Tahini chocolate chip oaties

https://www.diabetescarecommunity.ca/diet-and-fitness-articles/recipes/tahini-chocolate-chip-oaties/
These cookies are gluten-free and refined sugar-free naturally. The addition of quinoa flakes combined with the oats give the cookies a really nice texture.The Wet Ingredients The Dry Ingredients INSTRUCTIONS 
  1. Preheat the oven to 350˚F. Make sure the oven rack is in the middle of the oven.
  2. Line a cookie sheet with parchment paper.
  3. In a medium-sized bowl, mix together the wet ingredients.
  4. In a large bowl, mix together the dry ingredients.
  5. Mix the wet ingredients into the dry ingredients. Do not overmix.
  6. Drop even spoonfuls of dough on the cookie sheet.
  7. Bake for 16-18 min.
  8. Remove cookies as soon as you can from the sheet onto a cooling rack (they will have a crispy exterior and a chewy interior when they are cooled).
NOTE: NUTRITIONAL VALUE REFLECTS USE OF ½ OATS AND ½ QUINOA FLAKES. IF YOU WOULD LIKE TO SUBSTITUTE THE QUINOA FLAKES AND USE ALL OATS (1 cup total), SUGARS ARE 11g and CALORIES ARE 197.

Summer salad

https://www.diabetescarecommunity.ca/diet-and-fitness-articles/diabetes-diet-articles/summer-salad/
This refreshing summer salad is the perfect side dish during the hot summer months when you need something easy, tasty, and nutrient-dense. It is also loaded with fiber and can be made in 15 minutes or less.INGREDIENTS Lemon Dijon Dressing (makes ¼ cup) INSTRUCTIONS
  1. Prepare edamame beans according to package instructions. If using edamame beans that are in the pod, rinse with cold water once they are cooked until cool and gently pop the beans out of the pods.
  2. In a jar or small bowl, whisk together salad dressing ingredients. If you prefer a more tart dressing, add more apple cider vinegar or lemon juice to taste.
  3. In a bowl, toss lettuce, cucumber, cherry tomato, corn, edamame beans and strawberries until well combined.
  4. Add to two serving bowls and top with avocado slices, feta cheese, basil and drizzle 1 tablespoon of salad dressing on top to each bowl.
Serves 2 *This summer salad is a great option as a side salad but if you wish to make it a meal you can double the recipe ingredients and add 1 cup of edamame beans or an alternative source of protein such as chicken, hard-boiled eggs, salmon, or shrimp. NUTRITIONAL CONTENT FOR SALAD (without Dressing)NUTRITIONAL CONTENT FOR DRESSING

Key Lime Pie Ice Cream

https://www.diabetescarecommunity.ca/diet-and-fitness-articles/diabetes-diet-articles/key-lime-pie-ice-cream/
This recipe combines all the citrusy flavour of key lime pie into a healthy ice cream that is perfect to enjoy on a hot summer day. This recipe is also high in protein, healthy fats, and is made with only 7 ingredients.INGREDIENTS * When freezing bananas, choose semi-unripe (yellow/green) bananas instead of ripe bananas (yellow/brown) as they have a lower glycemic index. INSTRUCTIONS
  1. To a food processor or a high-speed blender, combine all ingredients and pulse until well combined. Taste as you go and add more lime juice or lime zest if you prefer a more tart flavour.
  2. Once smooth, portion ice cream into a serving bowl and cover with saran wrap. Let sit in the freezer for 2 hours or overnight.
  3. When ready to serve, take ice cream out of the freezer and let thaw for about 5 minutes before eating.
Makes: 1 cup of ice cream NOTE: Nutritional value does not include waffle cup.

Burger salad with spicy yogurt dressing

https://www.diabetescarecommunity.ca/diet-and-fitness-articles/recipes/burger-salad-with-spicy-yogurt-dressing/
This deconstructed turkey burger salad with a spicy yogurt dressing is loaded with classic burger toppings but with a healthy twist!INGREDIENTS Sriracha Yogurt Dressing (makes ½ cup) INSTRUCTIONS
  1. In a medium bowl, toss sweet potato cubes with ½ tbsp olive oil and 1 tsp each of salt & pepper. Air fryer instructions: Preheat air fryer to 400F. Add seasoned sweet potatoes to the air fryer basket and cook for 10-12 minutes, shaking the basket half way. Oven roasted instructions: Preheat oven to 425F. Transfer sweet potatoes to a baking sheet and spread evenly. Cook in the oven for 25-30 minutes, mixing half way.
  2. While sweet potatoes are cooking, heat a skillet with ½ tbsp of oil over medium-low heat. Once hot add ground turkey, dried basil, paprika, garlic powder, and 1 tsp each of salt and pepper. Cook for about 5-7 minutes until fully browned and evenly cooked. Set aside.
  3. While the beef cooks prepare sriracha yogurt dressing by combining Greek yogurt, olive oil, apple cider vinegar, lemon juice, garlic, salt, and sriracha to a small bowl and whisk to combine.
  4. To a medium bowl add lettuce, cheese, red onion, avocado, and tomato. Portion ½ cup of ground turkey and ⅓ cup of sweet potato and add to the salad.
  5. Drizzle 2-3 tbsp of yogurt dressing on top of salad and top with sesame seeds.
Serves: 1

Burger salad

Dressing

Strawberry Watermelon Bruschetta

https://www.diabetescarecommunity.ca/diet-and-fitness-articles/diabetes-diet-articles/strawberry-watermelon-bruschetta/
This strawberry watermelon bruschetta recipe is a refreshing take on classic bruschetta by adding seasonal fruit and fresh herbs on top of crunchy homemade crostini. This recipe can also be made in 25 minutes or less and only requires 9 ingredients to prepare!INGREDIENTS INSTRUCTIONS*
  1. To make homemade crostini, preheat the oven to 400F. Slice baguette into ½ inch slices and layer on a prepared baking sheet and lightly brush both sides with olive oil.
  2. Bake in the oven for 8-10 minutes until golden brown, carefully flipping halfway.
  3. While the crostinis are in the oven, prepare bruschetta mixture by combining watermelon, strawberries, lime juice, salt, mint, and basil in a bowl. Gently toss until well combined.
  4. Once the crostini are finished in the oven allow them to cool down for 3-5 minutes.
  5. Prepare strawberry watermelon bruschetta by layering about 1 tbsp of ricotta cheese on to the crostini and topping with a spoonful of the bruschetta mixture.
*optional to drizzle balsamic glaze on top of strawberry watermelon bruschetta but please note that most balsamic glaze varieties are higher in sugar so opt for a lower sugar option if possible.

Grilled Peach Salad

https://www.diabetescarecommunity.ca/diet-and-fitness-articles/recipes/grilled-peach-salad/
Put your grill to good use with this delicious grilled peach salad! Topped with a lemon basil dressing, this salad brings all the flavours of summer into one nutrient-dense salad.INGREDIENTS Lemon Basil Dressing (makes ¼ cup) INSTRUCTIONS
  1. Heat a grill pan or your BBQ over medium-high heat. Lightly brush both sides of peach slices with olive oil and place on the heated pan or grill. Grill for 3-5 minutes until peaches become soft and are browned with grill marks. Flip peaches and grill on the other side for another 2-3 minutes.
  2. Prepare dressing by whisking together olive oil, basil, lemon juice, dijon mustard, honey, and salt. Set aside.
  3. Prepare salad by layering a serving bowl with mixed greens, grilled peaches, cherry tomatoes, red onion, crushed almonds*, and goats cheese.
  4. Drizzle with salad dressing, serve and enjoy!
*If you don’t have almonds on hand, any chopped nut will work for this recipe (i.e. walnuts, cashews, pecans, etc.) Serves: 2

Spicy Roasted Green Beans

https://www.diabetescarecommunity.ca/diet-and-fitness-articles/diabetes-diet-articles/spicy-roasted-green-beans/
These spicy roasted green beans make for the perfect side-dish or appetizer and are a delicious way to get in your greens! This recipe only requires 9 ingredients and 20 minutes to prepare.INGREDIENTS Optional toppings** INSTRUCTIONS
  1. Preheat the oven to 425F.
  2. Wash and trim green beans, and pat dry with paper towel to absorb excess moisture.
  3. To a prepared baking sheet, add green beans, olive oil, and pepper. Gently combine and spread evenly on baking sheet.
  4. Bake for 15-17 minutes until parts of green beans are golden and lightly blistered.
  5. While green beans are roasting, prepare sauce by whisking together garlic, honey, rice wine vinegar, soy sauce, sesame oil, and red pepper flakes.
  6. Add roasted green beans to a shallow dish and drizzle spicy sauce on top. Mix until well combined.
  7. Serve green beans as a side-dish or appetizer, and top with sesame seeds, green onion, and cilantro.
*If you prefer a spicier sauce you can increase chili flakes to ½ tsp ** Toppings not included in nutrient analysis Serves: 4

Lentil Shepherd's Pie

https://www.diabetescarecommunity.ca/diet-and-fitness-articles/recipes/lentil-shepherds-pie/
This lentil shepherd's pie is the perfect family-friendly dinner to enjoy over the holiday season or simply during a cold weekday night. It is also loaded with fiber, protein, and flavour!INGREDIENTS Topping Filling INSTRUCTIONS
  1. Prepare mashed potatoes: Bring a large pot of water to a boil and add sweet potatoes. Cook for 20-30 minutes, or until fork tender.
  2. Drain potatoes and begin to mash with a hand masher or fork. Mix in milk and melted butter.
  3. Prepare filling: in an oven safe pot or skillet, heat olive oil over medium heat. Add onions and sauté until fragrant, about 5-7 minutes.
  4. Add garlic, thyme, basil, and soy sauce, and sauté for 2-3 minutes.
  5. Add frozen vegetables and 1 cup of stock. Combine ½ cup of the left over stock with 2 tbsp of cornstarch, mixing with a fork until well combined, then add to the pan.
  6. Add crushed tomatoes and lentils to the pan. Mix everything together and increase the heat to bring to a simmer. Let simmer until the lentil mixture thickens, about 5 minutes.
  7. Preheat the oven to 350F. Carefully spoon the sweet potato mash on top of the lentil mixture, and using a fork or large spoon spread into an even layer.
  8. Bake lentil shepherd's pie in the oven for 15-20 minutes, or until it starts to bubble on the sides.
  9. Serve and enjoy!
Serves: 6

Curried Cauliflower with Mint Yogurt Sauce

https://www.diabetescarecommunity.ca/diet-and-fitness-articles/recipes/curried-cauliflower-with-mint-yogurt-sauce/
This roasted curry cauliflower is as delicious as it is easy on the eyes. This colourful and flavourful vegetable side-dish is made extra tasty when combined with a homemade mint yogurt sauce.INGREDIENTS Garnish Yogurt Mint Sauce (makes ½ cup of sauce) INSTRUCTIONS
  1. Preheat oven to 425F. Prepare a baking sheet with parchment paper, and set aside.
  2. Place cauliflower florets into a bowl and toss with curry powder, garlic powder, turmeric, pepper, salt, lemon juice, and olive oil. Mix until evenly coated.
  3. Spread cauliflower in a single layer on the baking sheet and roast in the oven for 25-30 minutes mixing half way, or until florets are tender and golden.
  4. While the cauliflower is in the oven, prepare yogurt mint sauce by combining yogurt, mint, garlic, cilantro, lemon juice, salt and pepper in a food processor or blender. Blend until smooth and well combined, set aside.
  5. To a mixing bowl, combine roasted cauliflower with cilantro, red onion, and pomegranate.
  6. Portion one cup of cauliflower mixture to a side dish and top with 3 tablespoons of yogurt mint sauce.
Serves: 3

Pumpkin Protein Smoothie

https://www.diabetescarecommunity.ca/diet-and-fitness-articles/recipes/pumpkin-protein-smoothie/
This pumpkin protein smoothie not only tastes like fall but also provides 10 grams of protein per serving!INGREDIENTS INSTRUCTIONS
  1. Add all ingredients to a high-speed blender, and pulse until well combined and smooth.
  2. Pour into two glasses.
  3. Serve and enjoy!
Serves: 2

Chocolate Pumpkin Chia Pudding

https://www.diabetescarecommunity.ca/diet-and-fitness-articles/recipes/chocolate-pumpkin-chia-pudding/
This chocolate pumpkin chia pudding doubles as a nutrient-dense breakfast and flavourful dessert perfect for the Thanksgiving season. Not only does it taste like fall, but it is also loaded with protein and fiber.INGREDIENTS INSTRUCTIONS
  1. In a bowl or medium container, combine pumpkin puree, chia seeds, milk, honey, vanilla, nut butter, and pumpkin spice. Gently mix until well combined. Let sit in the fridge for 4 hours or overnight.
  2. Prepare chocolate yogurt by mixing together yogurt and cocoa powder. Set aside.
  3. In a small jar or bowl, layer pumpkin chia seed pudding with chocolate yogurt.
  4. Serve and enjoy!
Serves: 3

Apple Cinnamon Tea

https://www.diabetescarecommunity.ca/diet-and-fitness-articles/recipes/apple-cinnamon-tea/
This apple cinnamon tea tastes like comfort in a mug! Infused with aromatic spices of the holiday season, this apple cinnamon tea is suitable for holiday festivities or a cozy night in.INGREDIENTS INSTRUCTIONS
  1. In a medium saucepan, bring water to a boil.
  2. Add the cinnamon sticks, apple slices, cloves, star anise, and allspice berries to the boiling water.
  3. Reduce heat to medium-low and let simmer for 15-20 minutes to allow spices to infuse together.
  4. Remove the saucepan from heat and add the tea bags. Let steep for 3-5 minutes.
  5. Remove tea bags and strain tea into a teapot or two mugs.
  6. Serve apple cinnamon tea hot with some additional apple slices and a pinch of ground cinnamon. Optional to sweeten with a drop of honey or your choice of sweetener.
Serves: 2

Honey Garlic Chicken Stir Fry

https://www.diabetescarecommunity.ca/diet-and-fitness-articles/diabetes-diet-articles/honey-garlic-chicken-stir-fry/
This high-protein chicken stir fry is loaded with vegetables, fiber, 3 sources of protein, and delicious flavour! It is perfect as a weeknight dinner or meal prep.INGREDIENTS INSTRUCTIONS
  1. Add olive oil to a skillet over medium heat and sautégarlic for 2-3 minutes until fragrant.
  2. Season chicken with garlic powder and pepper, add to the pan and cook covered for about 3-4 minutes on each side until cooked all the way through. Set aside.
  3. In a separate bowl, whisk together soy sauce, honey, rice wine vinegar, water, and cornstarch.
  4. To the same pan, add mushrooms, bok choy, carrots, and sauce. Cook until vegetables are soft, and sauce starts to thicken, about 3-4 minutes.
  5. Add chicken, edamame, cashews, and soba noodles to the pan and mix together with the vegetables and sauce until everything is well combined.
  6. Garnish with green onion.
  7. Serve and enjoy!
Serves: 2

Halloween spider energy balls

https://www.diabetescarecommunity.ca/diet-and-fitness-articles/recipes/halloween-spider-energy-balls/
These Halloween spider energy balls make for the perfect nutrient-dense Halloween-themed spooky snack.INGREDIENTS INSTRUCTIONS
  1. In a large bowl, combine rolled oats, nut butter, honey, cocoa powder, ground flax seed, chia seed, and vanilla extract. Mix until well combined.
  2. Once all ingredients are evenly incorporated, use a teaspoon to scoop mixture and form a ball using your hands.
  3. Carefully insert 6 pretzel sticks into each energy ball (3 on each side) to form the spider “legs”. Add two pomegranate arils on top to form the “eyes”.
  4. Let the spider energy balls sit in the fridge to set for 30 minutes.
  5. Serve and enjoy!
Makes 10 energy balls

Cauliflower rice tabbouleh

https://www.diabetescarecommunity.ca/diet-and-fitness-articles/recipes/cauliflower-rice-tabbouleh/
This crowd-pleasing tabbouleh recipe gets an extra dose of fiber with the addition of cauliflower rice. It also makes for a delicious and nutrient-rich side dish that you can enjoy any night of the week.INGREDIENTS INSTRUCTIONS
  1. To a food processor, add raw cauliflower florets and pulse until it forms a riced consistency.
  2. To a mixing bowl, toss the cauliflower rice, tomatoes, cucumber, green onion, mint, parsley, and pomegranate seeds. Mix until well combined.
  3. In a small bowl, whisk together olive oil, lemon juice, red wine vinegar, salt and pepper. Drizzle on top of cauliflower tabbouleh, and mix until well combined.
  4. Serve and enjoy!
Serves: 2

Blender oatmeal yogurt pancakes

https://www.diabetescarecommunity.ca/diet-and-fitness-articles/recipes/blender-oatmeal-yogurt-pancakes/
These blender oatmeal pancakes are not only super easy to whip up but they are also loaded with protein and fiber thanks to the addition of Greek yogurt, rolled oats, and flaxseed.INGREDIENTS INSTRUCTIONS
  1. To a blender, add oats and blend until you reach a flour-like consistency.
  2. Add the yogurt, banana, eggs, flaxseed, vanilla, cinnamon, baking powder, and salt to the same blender and continue to blend until all ingredients are well combined and form a smooth batter.
  3. Let the batter rest for 10 minutes, as this will allow the oats to absorb the liquid and thicken.
  4. Lightly grease a non-stick skillet with cooking spray and preheat over medium-heat.
  5. Pour ¼ cup of batter onto the skillet for each pancake and cook each pancake for 2-3 minutes, or until bubbles begin to appear on the surface.
  6. Flip each pancake and cook for another 1-2 minutes or until golden brown.
  7. Serve pancakes with fresh fruit and yogurt and enjoy!
Serves: 2

Chipotle butternut squash soup

https://www.diabetescarecommunity.ca/diet-and-fitness-articles/recipes/chipotle-butternut-squash-soup/
This chipotle butternut squash soup is perfect for those chilly weeknights when you are craving something warm and creamy with a bit of spicy-flare.INGREDIENTS Toppings INSTRUCTIONS
  1. To a large skillet or saucepan, heat oil over medium heat. Add chopped onion and garlic and sauteé for 5 minutes.
  2. Add butternut squash cubes, chipotle pepper(s), vegetable broth, nutritional yeast, cannellini beans, chili powder, and cumin to the pot and bring to a boil. Reduce to a simmer and cook butternut squash until soft, about 5-6 minutes or until fork tender.
  3. Using an immersion blender or regular blender, puree soup until smooth and creamy. If you prefer a thinner consistency, you can add more water or vegetable broth.
  4. Garnish soup with a squeeze of lime juice and chopped cilantro. You can also top with feta cheese, corn, or pumpkin seeds.
Serves: 3 *Note that the toppings are included in the nutrient analysis.

Chili lime roasted edamame

https://www.diabetescarecommunity.ca/diet-and-fitness-articles/recipes/chili-lime-roasted-edamame/
Nothing beats a tasty high-protein snack and these chili lime roasted edamame make for a delicious, flavourful, and easy snack recipe that you can prepare in the air fryer.INGREDIENTS INSTRUCTIONS
  1. Preheat the air fryer to 375F (190C).
  2. Thaw edamame under cold running water and let it soak for 10 minutes or until no longer frozen. Drain and pat the edamame dry with paper towels or a clean kitchen cloth.
  3. In a large mixing bowl, toss the edamame with olive oil, soy sauce, chili powder, garlic powder, onion powder, lime zest, and a pinch of salt and pepper. Toss until evenly coated.
  4. Transfer the seasoned edamame to the air fryer, spreading them out in a single layer for even cooking. If you have a smaller air fryer, you may need to cook the edamame in batches.
  5. Roast the edamame for 10-15 minutes, shaking the basket halfway to ensure they cook evenly.
  6. Once the edamame is crispy and slightly browned, remove from the air fryer and toss with lime juice. Serve and enjoy as a tasty snack!
*To prepare the roasted edamame in the oven, add seasoned edamame to a prepared baking sheet and bake for 20-25 minutes at 400F (200C). Makes: 2 cups (4 servings)

Cranberry balsamic chicken

https://www.diabetescarecommunity.ca/diet-and-fitness-articles/recipes/cranberry-balsamic-chicken/
This cranberry balsamic chicken uses a flavourful marinade of cranberries, balsamic, and orange and is a crowd pleasing hit for holiday festivities!Marinade   INSTRUCTIONS
  1. In a blender or food processor, combine cranberries, balsamic vinegar, olive oil, garlic, thyme, onion powder, orange zest, orange juice, salt, and pepper. Blend the ingredients until smooth and well-combined.
  2. Place the chicken breasts in a large zip-lock bag or a shallow dish. Pour the cranberry balsamic marinade over the chicken, making sure each piece is well-coated. Seal the bag or cover the dish with plastic wrap.
  3. Refrigerate the chicken and let it marinate for at least 30 minutes to allow the flavors to penetrate the meat. For a deeper flavor, you can marinate it for several hours or even overnight.
  4. While the chicken is marinating, preheat the oven to 400F (200C). Add the marinated chicken to a prepared baking sheet and pour any leftover marinade on top.
  5. Arrange the sliced onion, garlic cloves, thyme sprigs, and orange slices on top of and around the chicken.
  6. Cover the chicken with aluminum foil and place in the oven, cooking for 25-30 minutes or until it reaches an internal temperature of 165F (74C). If you are using chicken breasts with the bone-in, cook for 40-45 minutes.
  7. Once the chicken is fully cooked, remove from the oven and serve with your favourite side dishes.
*Note that boneless and bone-in chicken breasts will have different cooking times. Read recipe instructions carefully to ensure that the chicken is fully cooked and reaches an internal temperature of 165F (74C). Serves: 8

Lentil mushroom stew

https://www.diabetescarecommunity.ca/diet-and-fitness-articles/recipes/lentil-mushroom-stew/
This savoury lentil mushroom stew is the perfect fibre-packed vegan friendly dinner to cozy up to during the cold winter months.INGREDIENTS Optional side dishes** INSTRUCTIONS
  1. In a large pot, heat olive oil over medium heat. Add chopped onion, garlic and carrot, sauté until translucent and carrots begin to soften, about 5-7 minutes.
  2. Add mushrooms to the pot, and cook for an additional 5-7 minutes.
  3. Stir in thyme, oregano, bay leaf, pepper, and tomato paste. Mix well to coat the vegetables with the herbs and paste.
  4. In a separate bowl, whisk together soy sauce, balsamic vinegar, and flour. Pour into the pan along with the broth.
  5. Bring mixture to a simmer and cook for about 5 minutes, allowing it to thicken.
  6. Stir in the lentils and allow to cook for an additional 5 minutes.
  7. Remove bay leaf and thyme stems. Portion into bowls, serve, and enjoy!
Serves: 4 *If you prefer to use a low or no carb thickening agent you can use xanthan gum instead. Add a ¼ teaspoon at a time until you reach your desired consistency. **These side dishes are suggestions and are not included in the nutrient analysis. ***Please note that potatoes are a high glycemic index food. If you are serving the lentil mushroom stew with a side of mashed potatoes we recommend a ½ cup serving size. You can read our blog post here for more information on the best potatoes to eat for diabetes.

Cornbread mini muffins

https://www.diabetescarecommunity.ca/diet-and-fitness-articles/recipes/cornbread-mini-muffins/
These cornbread mini muffins with green onion and jalapeño can be enjoyed as a snack or served as a delicious accompaniment to your favourite soups, stews or sauces.INGREDIENTS INSTRUCTIONS
  1. Preheat your oven to 400°F (200°C). Line a mini muffin tin with muffin liners or spray with cooking spray.
  2. In a large mixing bowl, whisk together cornmeal, almond flour, ground flaxseed, baking powder, baking soda, and salt.
  3. In another bowl, whisk together almond milk, Greek yogurt, eggs, applesauce, olive oil , and honey. Fold in chopped green onions and jalapeno.
  4. Pour the wet ingredients into the dry ingredients and stir until combined, being careful not to overmix.
  5. Using a spoon, carefully pour the batter into the muffin tin filling until about ⅔ full.
  6. Bake in the preheated oven for 10-15* minutes or until a toothpick inserted into the center comes out clean.
  7. Allow the mini muffins to cool in the tin for a few minutes before transferring them to a wire rack to cool completely.
  8. Enjoy cornbread muffins on their own or serve alongside soup, stews, and sauces.
Makes: 30 mini muffins (or 15 regular muffins) *If you are making regular sized muffins instead of mini muffins, increase the bake time to 17-20 minutes.

Green goddess salad

https://www.diabetescarecommunity.ca/diet-and-fitness-articles/recipes/green-goddess-salad/
This green goddess salad is a crunchy and delicious blend of greens and fresh herbs and makes for the perfect side salad to get your greens in!INGREDIENTS Dressing Toppings INSTRUCTIONS
  1. In a large salad bowl, combine the cabbage, green leaf lettuce, cucumber, jalapeno, and radish. Toss until everything is well combined.
  2. Prepare the salad dressing by adding to a blender or food processor the lemon juice, olive oil, basil, dill, garlic, and rice wine vinegar. When everything is finely minced, add the avocado and continue to blend until the dressing is smooth and creamy. If the dressing is too thick, you can thin it out by adding a few tablespoons of water.
  3. Pour the prepared dressing on top of the salad mixture, and gently toss everything together until ingredients are well coated with the dressing.
  4. Top with chopped pistachios and pomegranate seeds. Serve and enjoy!
Serves: 4 *To turn this green goddess salad into a meal you can increase the portion size to 3 cups and top it with 2 hard boiled eggs or grilled chicken breast.

Frozen yogurt berry bark

https://www.diabetescarecommunity.ca/diet-and-fitness-articles/recipes/frozen-yogurt-berry-bark/
This frozen yogurt berry bark is topped with mixed berries and pistachios and makes for a refreshing high-protein snack.INGREDIENTS INSTRUCTIONS
  1. To a mixing bowl, add the Greek yogurt, honey, and vanilla extract. Mix until well combined.
  2. Line a 8x8 inch baking pan with parchment paper and pour the yogurt mixture on top.
  3. Use a spatula to spread the yogurt mixture evenly on the baking sheet, aiming for about ¼ - ½ inch of thickness.
  4. Sprinkle the mixed berries, pomegranate seeds, and pistachio evenly over the yogurt bark. To ensure that they stick to the bark you can gently press them into the mixture.
  5. Place the baking sheet in the freezer and allow to freeze for 3-4 hours or until the yogurt is completely set and firm.
  6. When you are ready to serve, remove the yogurt bark from the freezer and allow it to sit at room temperature for a few minutes before breaking into pieces using a knife or your hands.
  7. Eat immediately to prevent melting.
Makes: 6 squares (approximately 3x4 inch) *To make this yogurt bark more festive for the holiday season, you can add a ¼ tsp of peppermint extract

Cranberry apple kefir smoothie

https://www.diabetescarecommunity.ca/diet-and-fitness-articles/recipes/cranberry-apple-kefir-smoothie/
This cranberry apple kefir smoothie is loaded with seasonal fruit for the winter season as well as an extra boost of probiotics and fibre. Kefir is a drinkable fermented milk, similar to a thin yogurt, and can be found in the dairy aisle or health food stores.INGREDIENTS INSTRUCTIONS
  1. In a blender, combine cranberries, chopped apple, almond milk, kefir, chia seeds, cinnamon, and lemon juice. If the smoothie is too thick you can add more almond milk until it reaches your desired consistency.
  2. If you prefer a colder smoothie, you can add a few ice cubes to the blender.
  3. Blend the ingredients on high speed until the mixture is smooth, creamy, and well combined.
  4. Pour the cranberry apple smoothie into a glass. Serve and enjoy!
Serves: 2 (makes approximately 3 cups)

Cabbage roll soup

https://www.diabetescarecommunity.ca/diet-and-fitness-articles/recipes/cabbage-roll-soup/
If you love a good cabbage roll then you are going to love this cabbage roll soup! This soup combines the traditional ingredients and flavours of a cabbage roll into one diabetes-friendly cozy soup.INGREDIENTS INSTRUCTIONS
  1. In a large pot, heat olive oil over medium-high heat.
  2. Stir in the diced onion, garlic, carrot, oregano, and paprika. Cook for 5-7 minutes until the onions and carrots soften.
  3. Add in the ground meat and soy sauce, cooking until browned.
  4. Add the chopped cabbage to the pot. Stir and cook for a few minutes until it starts to wilt.
  5. Pour in the condensed tomato soup and diced tomatoes (with their juices), beef broth. Add a bay leaf and stir well to combine ingredients together.
  6. Bring the soup to a boil, then reduce the heat to low. Let it simmer for about 20-25 minutes or until the cabbage is tender.
  7. Transfer cabbage roll soup to a serving bowl and garnish with parsley. Serve and enjoy!
Makes: 4 servings Prep time: 15 minutes Cook time: 35 minutes Additional Notes

Eggplant parmesan

https://www.diabetescarecommunity.ca/diet-and-fitness-articles/diabetes-diet-articles/eggplant-parmesan/
This hearty eggplant parmesan is crunchy on the outside, tender on the inside, and coated with savory marinara and melted cheese. Enjoy it as a filling and satisfying dinner that is loaded with fiber, protein, and flavor! Prep time: 20 minutes Cook time: 45 minutes Yield: 4 servingsINGREDIENTS: INSTRUCTIONS:
  1. Slice eggplants, sprinkle both sides with salt, and lay them out evenly on a paper towel or a cooling rack.
  2. Allow the salted eggplant to sit for at least 30 minutes to 1 hour. The salt will draw out moisture from the eggplant and you will begin to see droplets of moisture forming on the surface. Use paper towels or a clean kitchen cloth to pat dry the eggplant thoroughly and remove the excess salt. Press gently to remove as much moisture as possible.
  3. Preheat your oven to 400°F (200°C) and line a baking sheet with parchment paper.
  4. In a shallow bowl, mix the breadcrumbs (or almond meal), oregano, basil, garlic powder, onion powder, red pepper flakes, and grated Parmesan cheese.
  5. In a separate bowl, whisk beaten eggs with almond milk.
  6. Dip each eggplant slice into the egg mixture, then coat it evenly with the breadcrumb mixture. Place the coated slices on the prepared baking sheet.
  7. Bake in the preheated oven for 20-25 minutes, flipping halfway through, until the slices are golden brown and tender. Remove from the oven and reduce the oven temperature to 350°F (175°C).
  8. In a baking dish, spread a thin layer of marinara sauce and arrange half of the baked eggplant slices in a single layer over the sauce.
  9. Spread another layer of marinara sauce over the eggplant slices.
  10. Sprinkle half of the shredded mozzarella cheese over the sauce.
  11. Repeat the layers with the remaining eggplant slices, marinara sauce, and shredded mozzarella cheese.
  12. Cover the baking dish with foil and bake in the oven for 20-25 minutes until the cheese is melted and bubbly.
  13. Once done, remove from the oven and let it sit for a few minutes before serving.
  14. Garnish with fresh basil leaves if desired before serving.
Notes: *If you do not have access to almond meal you can use whole grain breadcrumbs instead.

Smash Burger Tacos

https://www.diabetescarecommunity.ca/diet-and-fitness-articles/diabetes-diet-articles/smash-burger-tacos/
These smash burger tacos combine the flavours of a burger and taco all in one delicious hand held meal. Topped with classic vegetable toppings and a spicy yogurt sauce it is a guaranteed crowd pleaser for burger and taco lovers alike. Prep time: 10 minutes Cook time: 10 minutes Yield: 12 small tacosINGREDIENTS: INSTRUCTIONS:
  1. In a mixing bowl, combine ground meat with garlic powder, onion powder, paprika, salt, and pepper.
  2. Divide the ground meat into small portions, about 2-ounce balls. Press each ball into one side of a tortilla until the face of the tortilla is mostly covered.
  3. Heat a cast-iron skillet or non-stick pan over medium-high heat. Brush the meat side of each tortilla lightly with olive oil and place it meat-side down on the skillet.
  4. Use a spatula to firmly press the tortilla into the skillet. Cook for about 3-4 minutes or until the tortilla starts to crisp up.
  5. Flip each tortilla so that they are meat-side up, and sprinkle with ½ tablespoon of shredded cheese. Once cheese is fully melted, remove tortilla from the skillet and set aside.
  6. Top each smash burger patty with shredded lettuce, sliced tomatoes, sliced red onion, and sliced avocado. Using a spoon or a piping bag, drizzle the spicy yogurt sauce on top of each taco and garnish with cilantro.
  7. Fold the tortillas over the burger and toppings to create tacos. Serve and enjoy!

Barley and Mushroom Risotto

https://www.diabetescarecommunity.ca/diet-and-fitness-articles/diabetes-diet-articles/barley-and-mushroom-risotto/
This hearty and flavourful mushroom risotto uses barley for an extra boost of soluble fibre. Enjoy it as a creamy and comforting side dish that can complement any meal! Prep time: 5-10 minutes Cook time: 45-50 minutes Yield: Approximately 4-5 cupsINGREDIENTS INSTRUCTIONS
  1. In a large skillet, heat olive oil over medium heat. Add onions and sauté until they become soft and translucent, about 4 minutes.
  2. Add minced garlic and sliced mushrooms to the skillet. Cook until the mushrooms release their moisture and become golden brown, about 5 minutes.
  3. Add in the barley along with white wine (if using) to deglaze the pan, scraping up any browned bits from the bottom. Allow the wine to reduce by half. If you are not using white wine you can add ¼ cup of broth instead.
  4. Stir in thyme, bay leaves, soy sauce, and black pepper, mixing well to combine with the rest of the ingredients.
  5. Add in the vegetable broth and bring to a boil. Reduce the heat and bring down to a simmer, cover, and let cook for 45-50 minutes or until the broth is completely absorbed by the barley, stirring occasionally.
  6. If the barley is still not cooked by the time the broth is absorbed, add more broth to the pan.
  7. Once barley is fully cooked and chewy, mix in parmesan cheese and red pepper flakes if using. Top with chopped parsley to garnish and serve!
*Note that wine is an optional ingredient and was not included in the nutrient analysis.

Buckwheat nourish bowl

https://www.diabetescarecommunity.ca/diet-and-fitness-articles/diabetes-diet-articles/buckwheat-nourish-bowl/
Buckwheat groats provide a delicious and chewy base to this savoury nourish bowl with eggs and vegetables. Enjoy it as a nutrient-dense breakfast or lunch that can be prepared in 20 minutes or less! Prep time: 5-7 minutes Cook time: 15 minutes Yield: 1 servingINGREDIENTS Optional garnish INSTRUCTIONS
  1. Rinse the buckwheat groats under cold running water.
  2. In a small saucepan, combine the rinsed buckwheat groats with broth. Bring to a boil, then reduce heat, cover, and simmer for about 15-20 minutes, or until the groats are tender and the liquid is absorbed. Fluff with a fork.
  3. While the buckwheat is cooking, heat a non-stick skillet over medium heat. Add the red onion, and bell pepper. Sauté for about 4 minutes before adding the sliced mushroom. Season with salt and pepper, cook for an additional 3-4 minutes, or until mushrooms have softened.
  4. Push the vegetables to the side of the skillet and crack the eggs into the empty space. Cook the egg to your desired doneness, either scrambled with the vegetables or fried separately.
  5. To assemble, place the cooked buckwheat groats in a bowl. Top with the sautéed vegetables and the cooked eggs. Garnish with green onion and red chili flakes, if desired.